
UserExperior’s 3rd party integration enables you to integrate UserExperior with industry-leading quantitative analytics tools. This integration enables you to look at both quantitative and qualitative data inside your analytics tool.
NOTE: We currently support only Native Android and iOS.
Amplitude
Integration
1. Switch On the Amplitude in UserExperior Settings
Go to UserExperior Dashboard > Go to your app folder > Go to Settings > Select Integrations > Switch On Amplitude

Note: Make sure to switch on the integration for the respective platform i.e. for the Android and the iOS.
2. Add UserExperior Listener/ Delegate immediately after startRecording:
Note: In case of more than one 3rd party integrations, reuse the Listener/ Delegate mentioned below.
Android
Add following code in onCreate method of every launcher activity.
UserExperior.startRecording(getApplicationContext(), "your-version-key-here");
// UserExperior Listener: Third Party Integration
UserExperior.setUserExperiorListener(new UserExperiorListener() {
@Override
public void onUserExperiorStarted() {
// Sending UserExperior Session URL to Amplitude
String ueSessionUrl = UserExperior.getSessionUrl("Amplitude");
JSONObject eventProperties = new JSONObject();
try{
eventProperties.put("UE_Session_URL", ueSessionUrl);
} catch (JSONException exception) {
}
Amplitude.getInstance().logEvent("UE_Session_URL", eventProperties);
}
});
iOS
Swift
// Step 1: Add the UserExperiorDelegate protocol in your `AppDelegate.swift`
class AppDelegate: UIResponder, UIApplicationDelegate, UserExperiorDelegate {
}
func application(_ application: UIApplication, didFinishLaunchingWithOptions launchOptions: [UIApplication.LaunchOptionsKey: Any]?) -> Bool {
UserExperior.initialize("USER_KEY")
// Step 2: Setting delegate after UserExperior initialize
UserExperior.setDelegate(self)
return true
}
// Step 3: Implement UserExperiorDelegate protocol
func userExperiorSessionDidStart() {
let sessionURL = UserExperior.getSessionUrl("Amplitude") // "Amplitude" is the key used to identify Amplitude
Amplitude.instance()?.logEvent("UE_Session_URL", withEventProperties: ["UE_Session_URL": sessionURL])
}
Objective-C
// Step 1: Add the UserExperiorDelegate protocol in your `AppDelegate.m`
@interface AppDelegate () <UserExperiorDelegate>
@end
- (BOOL)application:(UIApplication *)application didFinishLaunchingWithOptions:(NSDictionary *)launchOptions {
// Override point for customization after application launch.
[UserExperior initialize:@"USER_KEY"];
// Step 2: Setting delegate after UserExperior initialize
[UserExperior setDelegate:self];
return YES;
}
// Step 3: Implement UserExperiorDelegate protocol
- (void)userExperiorSessionDidStart {
NSString *sessionURL = [UserExperior getSessionUrl:@"Amplitude"]; // "Amplitude" is the key used to identify Amplitude
[[Amplitude instance] logEvent:@"UE_Session_URL" withEventProperties:@{@"UE_Session_URL": sessionURL}];
}
React-Native
// Import the following(App.js)
import UserExperior from 'react-native-userexperior';
import { NativeModules, NativeEventEmitter } from 'react-native';
// UserExperior Initialization
UserExperior.startRecording('your-version-key-here');
// Add listener
const emitter = new NativeEventEmitter(NativeModules.UserExperior);
this.userExperiorListener = emitter.addListener('ON_USER_EXPERIOR_STARTED', async (status) => {
if (status) {
let sessionUrl = await UserExperior.getSessionUrl('Amplitude');
// Send session URL to Amplitude
}
});
UserExperior URL in Amplitude
After completing the integration, every Amplitude session will contain an event called "UE_Session_URL". You can just copy and paste the URL in your browser's window that will open the session in the UserExperior Dashboard. If the session was recorded you will be able to replay it in the UserExperior Dashboard.

AppsFlyer
Integration
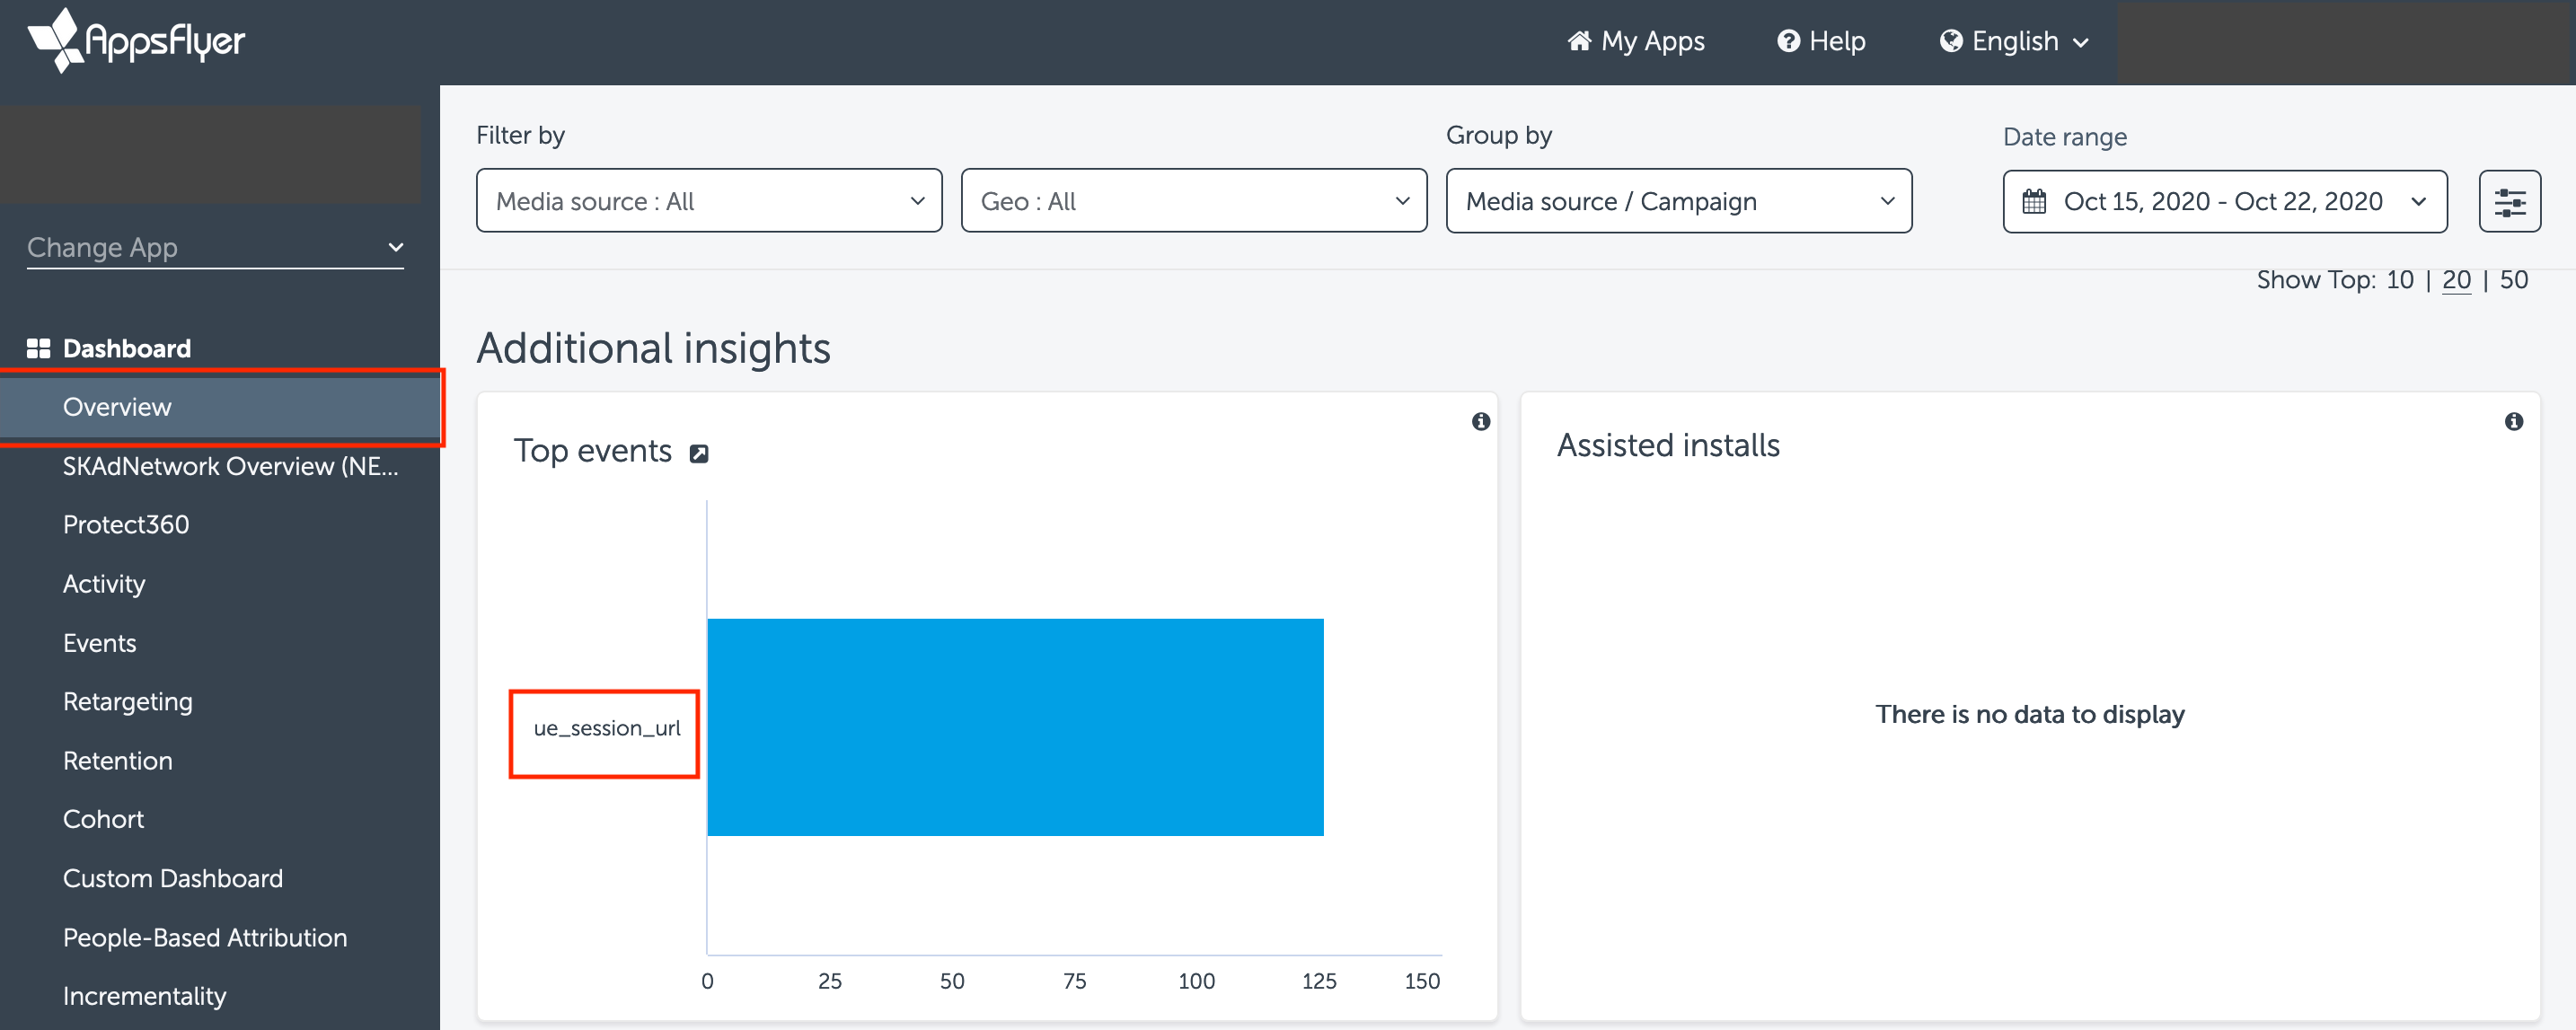
1. Switch On the AppsFlyer in UserExperior Settings
Go to UserExperior Dashboard > Go to your app folder > Go to Settings > Select Integrations > Switch On AppsFlyer

Note: Make sure to switch on the integration for the respective platform i.e. for the Android and the iOS.
2. Add UserExperior Listener/ Delegate immediately after startRecording:
Note: In case of more than one 3rd party integrations, reuse the Listener/ Delegate mentioned below.
Android
Add the following code in the onCreate method of every launcher activity.
UserExperior.startRecording(getApplicationContext(), "your-version-key-here");
// UserExperior Listener: Third Party Integration
UserExperior.setUserExperiorListener(new UserExperiorListener() {
@Override
public void onUserExperiorStarted() {
// Sending UserExperior Session URL to Mixpanel
String ueSessionUrl = UserExperior.getSessionUrl("AppsFlyer");
HashMap<String, Object> map = new HashMap<String, Object>();
map.put("UE_Session_URL", ueSessionUrl);
AppsFlyerLib.getInstance().trackEvent(getApplicationContext(), "UE_Session_URL", map);
}
});
iOS
Swift
// Step 1: Add the UserExperiorDelegate protocol in your `AppDelegate.swift`
class AppDelegate: UIResponder, UIApplicationDelegate, UserExperiorDelegate {
}
func application(_ application: UIApplication, didFinishLaunchingWithOptions launchOptions: [UIApplication.LaunchOptionsKey: Any]?) -> Bool {
UserExperior.initialize("USER_KEY")
// Step 2: Setting delegate after UserExperior initialize
UserExperior.setDelegate(self)
return true
}
// Step 3: Implement UserExperiorDelegate protocol
func userExperiorSessionDidStart() {
let sessionURL = UserExperior.getSessionUrl("AppsFlyer") // "AppsFlyer" is the key used to identify Apps Flyer
AppsFlyerLib.shared().logEvent("UE_Session_URL", withValues: ["UE_Session_URL": af_sessionURL])
}
Objective-C
// Step 1: Add the UserExperiorDelegate protocol in your `AppDelegate.m`
@interface AppDelegate () <UserExperiorDelegate>
@end
- (BOOL)application:(UIApplication *)application didFinishLaunchingWithOptions:(NSDictionary *)launchOptions {
// Override point for customization after application launch.
[UserExperior initialize:@"USER_KEY"];
// Step 2: Setting delegate after UserExperior initialize
[UserExperior setDelegate:self];
return YES;
}
// Step 3: Implement UserExperiorDelegate protocol
- (void)userExperiorSessionDidStart {
NSString *sessionURL = [UserExperior getSessionUrl:@"AppsFlyer"]; // "AppsFlyer" is the key used to identify Apps Flyer
[[AppsFlyerLib shared] logEvent: @"UE_Session_URL" withValues:@{@"UE_Session_URL": sessionURL}];
}
React-Native
// Import the following(App.js)
import UserExperior from 'react-native-userexperior';
import { NativeModules, NativeEventEmitter } from 'react-native';
// UserExperior Initialization
UserExperior.startRecording('your-version-key-here');
// Add listener
const emitter = new NativeEventEmitter(NativeModules.UserExperior);
this.userExperiorListener = emitter.addListener('ON_USER_EXPERIOR_STARTED', async (status) => {
if (status) {
let sessionUrl = await UserExperior.getSessionUrl('AppsFlyer');
// Send session URL to AppsFlyer
}
});
UserExperior URL in AppsFlyer
After completing the integration, every AppsFlyer session will contain an event called "UE_Session_URL". You can just copy and paste the URL in your browser's window that will open the session in the UserExperior Dashboard. If the session was recorded you will be able to replay it in the UserExperior Dashboard.
Apptimize
Integration
1. Switch On the Apptimize in UserExperior Settings
Go to UserExperior Dashboard > Go to your app folder > Go to Settings > Select Integrations > Switch On Apptimize

Note: Make sure to switch on the integration for the respective platform i.e. for the Android and the iOS.
2. Add UserExperior Listener/ Delegate immediately after startRecording:
Note: In case of more than one 3rd party integrations, reuse the Listener/ Delegate mentioned below.
Android
Add the following code in the onCreate method of every launcher activity.
UserExperior.startRecording(getApplicationContext(), "your-version-key-here");
// UserExperior Listener: Third Party Integration
UserExperior.setUserExperiorListener(new UserExperiorListener() {
@Override
public void onUserExperiorStarted() {
// Sending UserExperior Session URL to Apptimize
String ueSessionUrl = UserExperior.getSessionUrl("Apptimize");
Apptimize.track("UE_Session_URL :" + ueSessionUrl);
}
});
iOS
Swift
// Step 1: Add the UserExperiorDelegate protocol in your `AppDelegate.swift`
class AppDelegate: UIResponder, UIApplicationDelegate, UserExperiorDelegate {
}
func application(_ application: UIApplication, didFinishLaunchingWithOptions launchOptions: [UIApplication.LaunchOptionsKey: Any]?) -> Bool {
UserExperior.initialize("USER_KEY")
// Step 2: Setting delegate after UserExperior initialize
UserExperior.setDelegate(self)
return true
}
// Step 3: Implement UserExperiorDelegate protocol
func userExperiorSessionDidStart() {
let sessionURL = UserExperior.getSessionUrl("Apptimize") // "Apptimize" is the key used to identify Apptimize
Apptimize.track("UE_Session_URL", value: sessionURL)
}
Objective-C
// Step 1: Add the UserExperiorDelegate protocol in your `AppDelegate.m`
@interface AppDelegate () <UserExperiorDelegate>
@end
- (BOOL)application:(UIApplication *)application didFinishLaunchingWithOptions:(NSDictionary *)launchOptions {
// Override point for customization after application launch.
[UserExperior initialize:@"USER_KEY"];
// Step 2: Setting delegate after UserExperior initialize
[UserExperior setDelegate:self];
return YES;
}
// Step 3: Implement UserExperiorDelegate protocol
- (void)userExperiorSessionDidStart {
NSString *sessionURL = [UserExperior getSessionUrl:@"Apptimize"]; // "Apptimize" is the key used to identify Apptimize
[Apptimize track:@"UE_Session_URL" value:sessionURL];
}
React-Native
// Import the following(App.js)
import UserExperior from 'react-native-userexperior';
import { NativeModules, NativeEventEmitter } from 'react-native';
// UserExperior Initialization
UserExperior.startRecording('your-version-key-here');
// Add listener
const emitter = new NativeEventEmitter(NativeModules.UserExperior);
this.userExperiorListener = emitter.addListener('ON_USER_EXPERIOR_STARTED', async (status) => {
if (status) {
let sessionUrl = await UserExperior.getSessionUrl('Apptimize');
// Send session URL to Apptimize
}
});
UserExperior URL in Apptimize
After completing the integration, every Apptimize session will contain an event called "UE_Session_URL". You can just copy and paste the URL in your browser's window that will open the session in the UserExperior Dashboard. If the session was recorded you will be able to replay it in the UserExperior Dashboard.
CleverTap
Integration
1. Switch On theCleverTap in UserExperior Settings
Go to UserExperior Dashboard > Go to your app folder > Go to Settings > Select Integrations > Switch On CleverTap

Note: Make sure to switch on the integration for the respective platform i.e. for the Android and the iOS.
2. Add UserExperior Listener/ Delegate immediately after startRecording:
Note: In case of more than one 3rd party integrations, reuse the Listener/ Delegate mentioned below.
Android
Add the following code in the onCreate method of every launcher activity.
UserExperior.startRecording(getApplicationContext(), "your-version-key-here");
// UserExperior Listener: Third Party Integration
UserExperior.setUserExperiorListener(new UserExperiorListener() {
@Override
public void onUserExperiorStarted() {
// Sending UserExperior Session URL to CleverTap
String ueSessionUrl = UserExperior.getSessionUrl("CleverTap");
HashMap<String, Object> cleverTapUeMap = new HashMap<String, Object>();
cleverTapUeMap.put("UE_Session_URL", ueSessionUrl);
private CleverTapAPI cleverTapDefaultInstance = CleverTapAPI.getDefaultInstance(this);
if (cleverTapDefaultInstance != null) {
clevertapDefaultInstance.pushEvent("UE_Session_URL", cleverTapUeMap);
}
}
});
iOS
Swift
// Step 1: Add the UserExperiorDelegate protocol in your `AppDelegate.swift`
class AppDelegate: UIResponder, UIApplicationDelegate, UserExperiorDelegate {
}
func application(_ application: UIApplication, didFinishLaunchingWithOptions launchOptions: [UIApplication.LaunchOptionsKey: Any]?) -> Bool {
UserExperior.initialize("USER_KEY")
// Step 2: Setting delegate after UserExperior initialize
UserExperior.setDelegate(self)
return true
}
// Step 3: Implement UserExperiorDelegate protocol
func userExperiorSessionDidStart() {
let sessionURL = UserExperior.getSessionUrl("CleverTap") // "CleverTap" is the key used to identify Cleaver tap
CleverTap.sharedInstance()?.recordEvent("UE_Session_URL", withProps: ["UE_Session_URL": sessionURL])
}
Objective-C
// Step 1: Add the UserExperiorDelegate protocol in your `AppDelegate.m`
@interface AppDelegate () <UserExperiorDelegate>
@end
- (BOOL)application:(UIApplication *)application didFinishLaunchingWithOptions:(NSDictionary *)launchOptions {
// Override point for customization after application launch.
[UserExperior initialize:@"USER_KEY"];
// Step 2: Setting delegate after UserExperior initialize
[UserExperior setDelegate:self];
return YES;
}
// Step 3: Implement UserExperiorDelegate protocol
- (void)userExperiorSessionDidStart {
NSString *sessionURL = [UserExperior getSessionUrl:@"CleverTap"]; // "CleverTap" is the key used to identify Cleaver tap
[[CleverTap sharedInstance] recordEvent:@"UE_Session_URL" withProps:@{@"UE_Session_URL": sessionURL}];
}
React-Native
// Import the following(App.js)
import UserExperior from 'react-native-userexperior';
import { NativeModules, NativeEventEmitter } from 'react-native';
// UserExperior Initialization
UserExperior.startRecording('your-version-key-here');
// Add listener
const emitter = new NativeEventEmitter(NativeModules.UserExperior);
this.userExperiorListener = emitter.addListener('ON_USER_EXPERIOR_STARTED', async (status) => {
if (status) {
let sessionUrl = await UserExperior.getSessionUrl('CleverTap');
// Send session URL to CleverTap
}
});
UserExperior URL in CleverTap
After completing the integration, every CleverTap session will contain an event called "UE_Session_URL". You can just copy and paste the URL in your browser's window that will open the session in the UserExperior Dashboard. If the session was recorded you will be able to replay it in the UserExperior Dashboard.
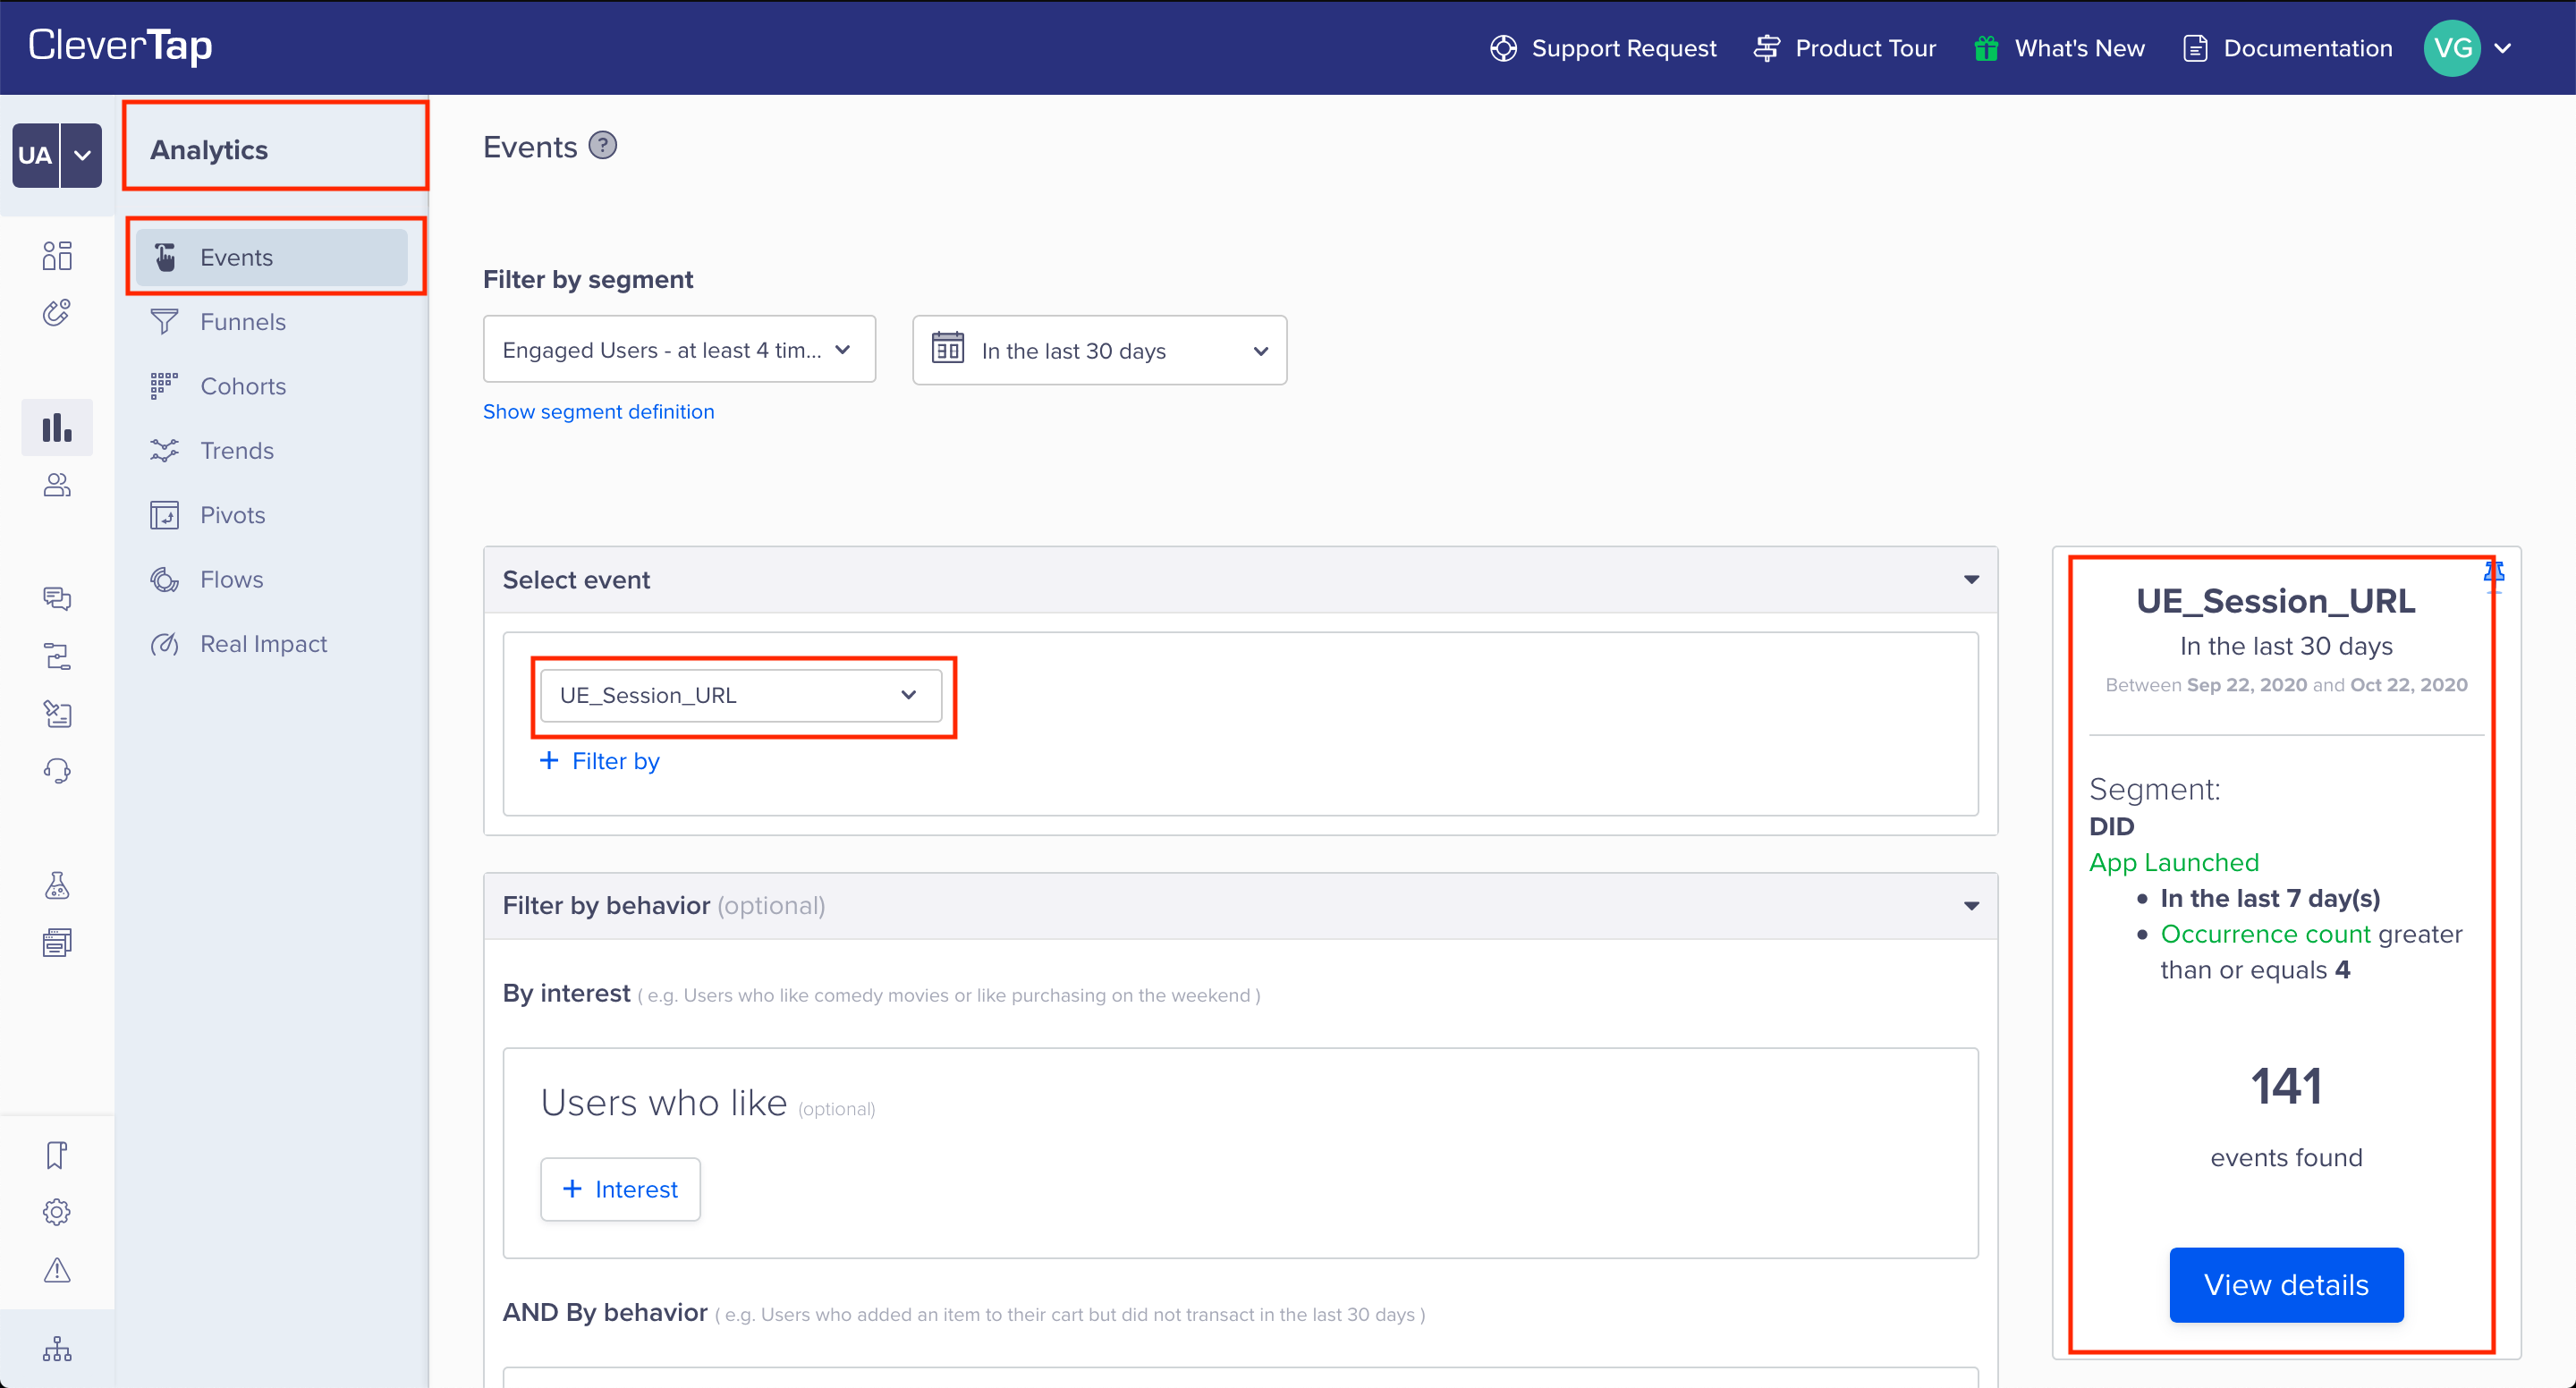
Go to Analytics > Events > Select Events. Enter UE_Session_URL and click on View details
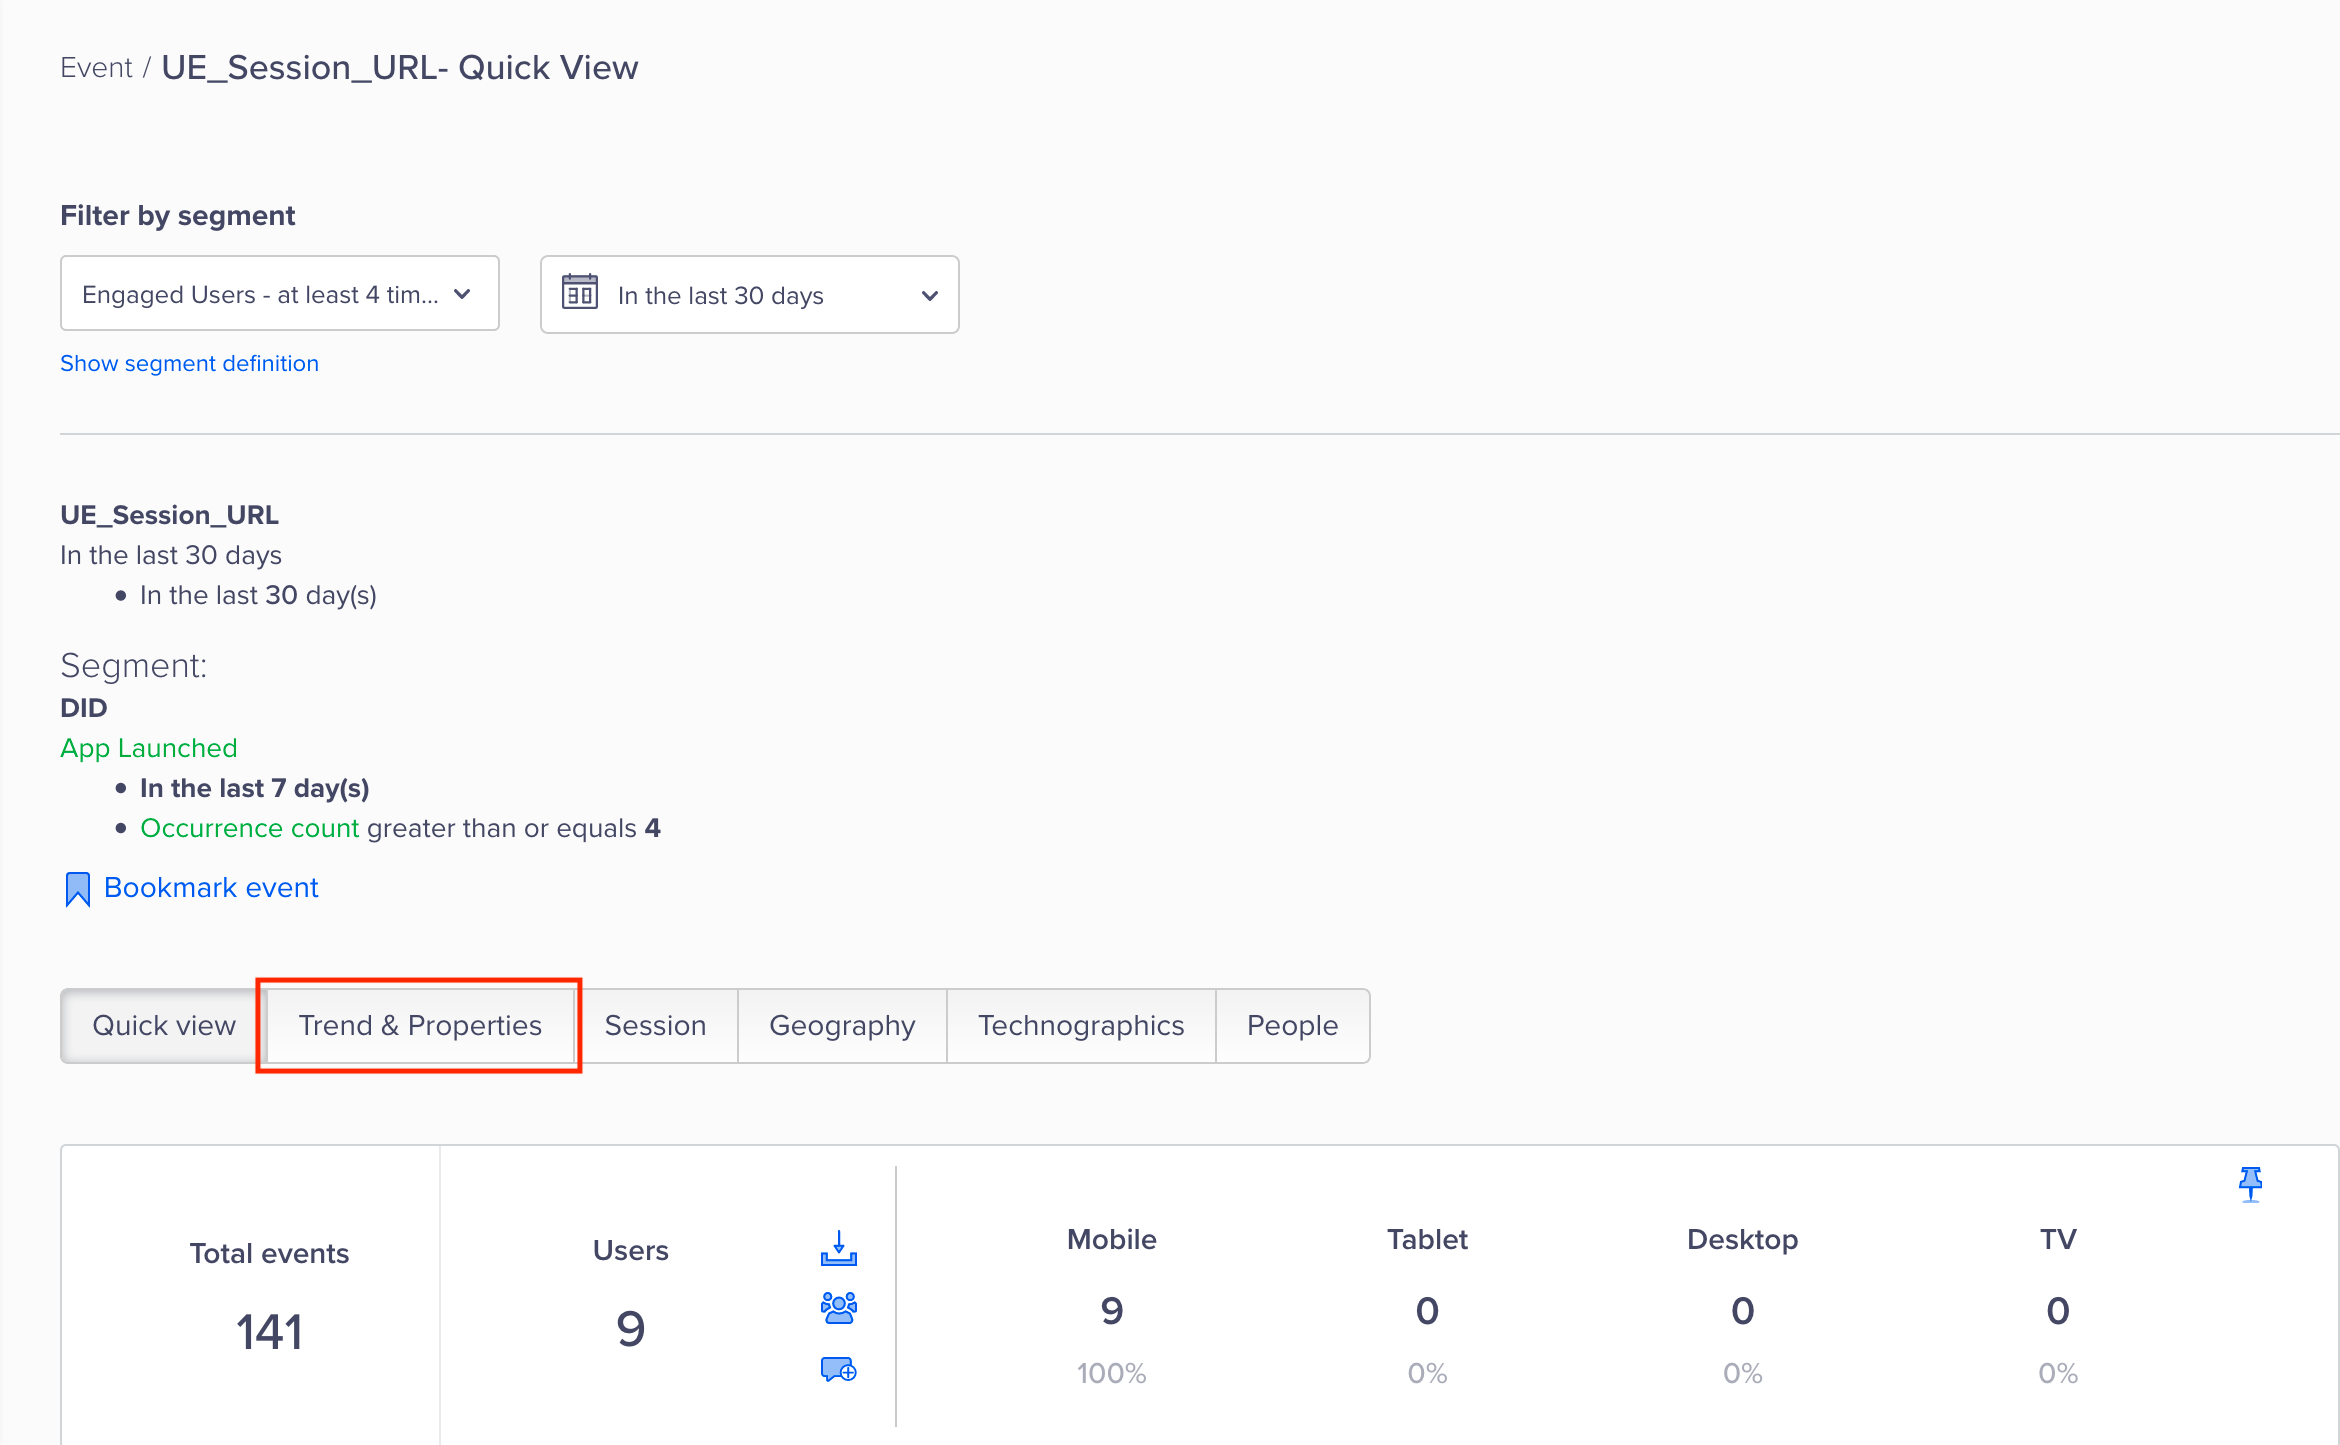
Select Trends and properties
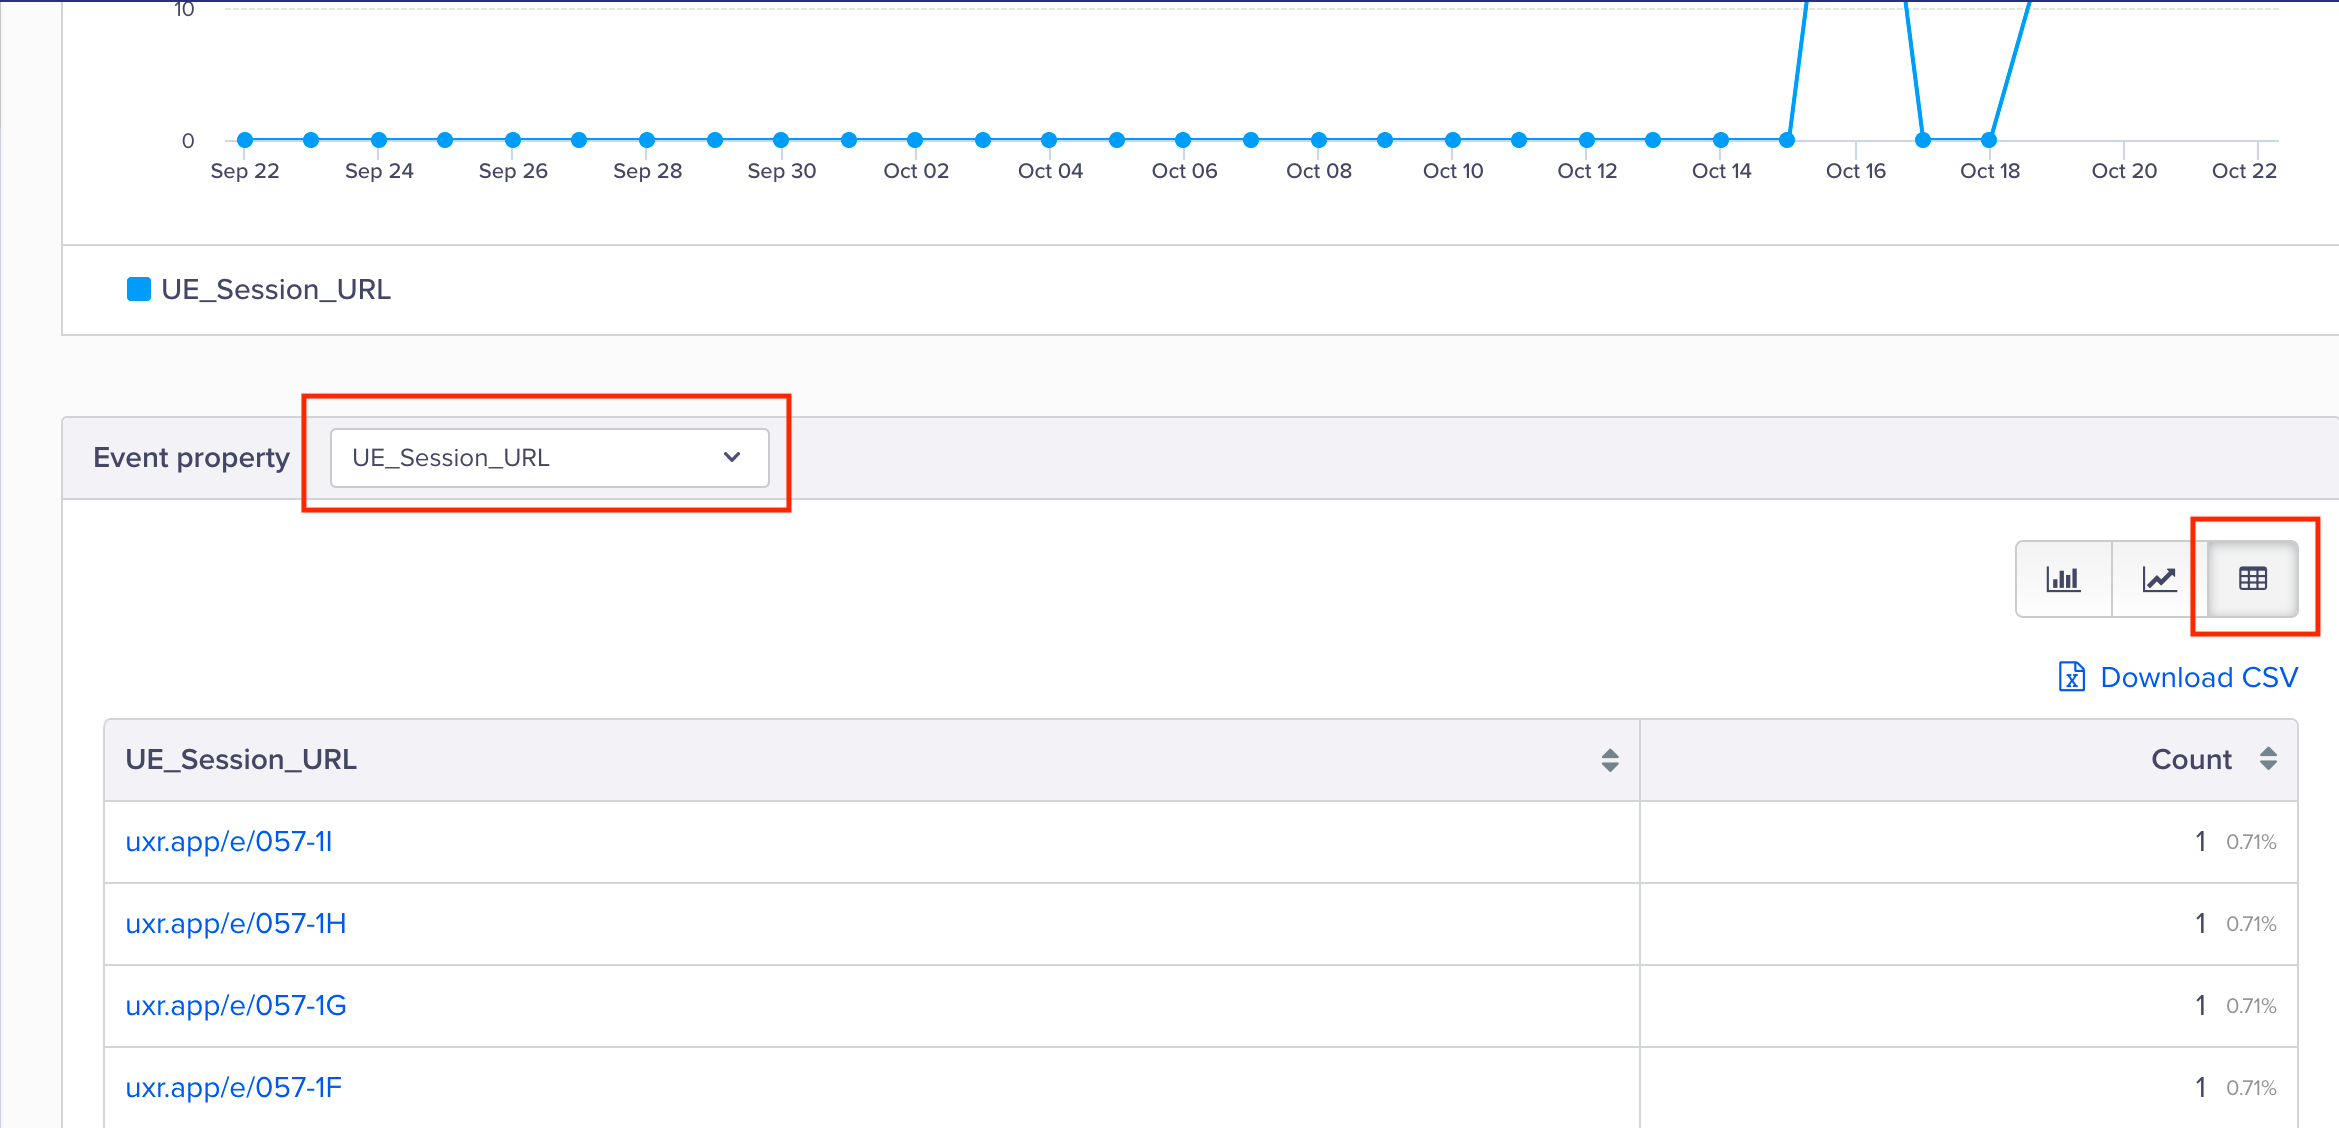
Under Event Property select UE_Session URL and click on list view
Firebase Crashlytics
Integration
1. Switch On the Firebase Crashlytics in UserExperior Settings
Go to UserExperior Dashboard > Go to your app folder > Go to Settings > Select Integrations > Switch On Firebase Crashlytics

Note: Make sure to switch on the integration for the respective platform i.e. for the Android and the iOS.
2. Add UserExperior Listener/ Delegate immediately after startRecording:
Note: In case of more than one 3rd party integrations, reuse the Listener/ Delegate mentioned below.
Android
Add the following code in the onCreate method of every launcher activity.
UserExperior.startRecording(getApplicationContext(), "your-version-key-here");
// UserExperior Listener: Third Party Integration
UserExperior.setUserExperiorListener(new UserExperiorListener() {
@Override
public void onUserExperiorStarted() {
// Sending UserExperior Session URL to Firebase Crashlytics
String ueSessionUrlFC = UserExperior.getSessionUrl("FirebaseCrashlytics");
if(ueSessionUrlFC != null) {
FirebaseCrashlytics.getInstance().setCustomKey("UE_Session_URL", ueSessionUrlFC);
}
}
});
iOS
Swift
// Step 1: Add the UserExperiorDelegate protocol in your `AppDelegate.swift`
class AppDelegate: UIResponder, UIApplicationDelegate, UserExperiorDelegate {
}
func application(_ application: UIApplication, didFinishLaunchingWithOptions launchOptions: [UIApplication.LaunchOptionsKey: Any]?) -> Bool {
UserExperior.initialize("USER_KEY")
// Step 2: Setting delegate after UserExperior initialize
UserExperior.setDelegate(self)
return true
}
// Step 3: Implement UserExperiorDelegate protocol
func userExperiorSessionDidStart() {
let sessionURL = UserExperior.getSessionUrl("FirebaseCrashlytics") // "FirebaseCrashlytics" is the key used for firebase craslytics
Crashlytics.crashlytics().setCustomValue(sessionURL, forKey: "UE_Session_URL")
}
Objective-C
// Step 1: Add the UserExperiorDelegate protocol in your `AppDelegate.m`
@interface AppDelegate () <UserExperiorDelegate>
@end
- (BOOL)application:(UIApplication *)application didFinishLaunchingWithOptions:(NSDictionary *)launchOptions {
// Override point for customization after application launch.
[UserExperior initialize:@"USER_KEY"];
// Step 2: Setting delegate after UserExperior initialize
[UserExperior setDelegate:self];
return YES;
}
// Step 3: Implement UserExperiorDelegate protocol
- (void)userExperiorSessionDidStart {
NSString *sessionURL = [UserExperior getSessionUrl:@"FirebaseCrashlytics"]; // "FirebaseCrashlytics" is the key used for firebase craslytics
[[FIRCrashlytics crashlytics] setCustomValue:sessionURL forKey:@"UE_Session_URL"];
}
React-Native
//Import the following(App.js)
import UserExperior from 'react-native-userexperior';
import crashlytics from '@react-native-firebase/crashlytics';
import { NativeModules, NativeEventEmitter } from 'react-native';
// UserExperior Initialization
UserExperior.startRecording('your-version-key-here');
// Add listener
const emitter = new NativeEventEmitter(NativeModules.UserExperior);
this.userExperiorListener = emitter.addListener('ON_USER_EXPERIOR_STARTED', async (status) => {
if (status) {
let sessionUrl = await UserExperior.getSessionUrl('FirebaseCrashlytics');
if (sessionUrl != '') {
crashlytics().setAttribute('UE_SESSION_URL', sessionUrl);
} else {
console.log('SessionUrl empty');
}
}
});
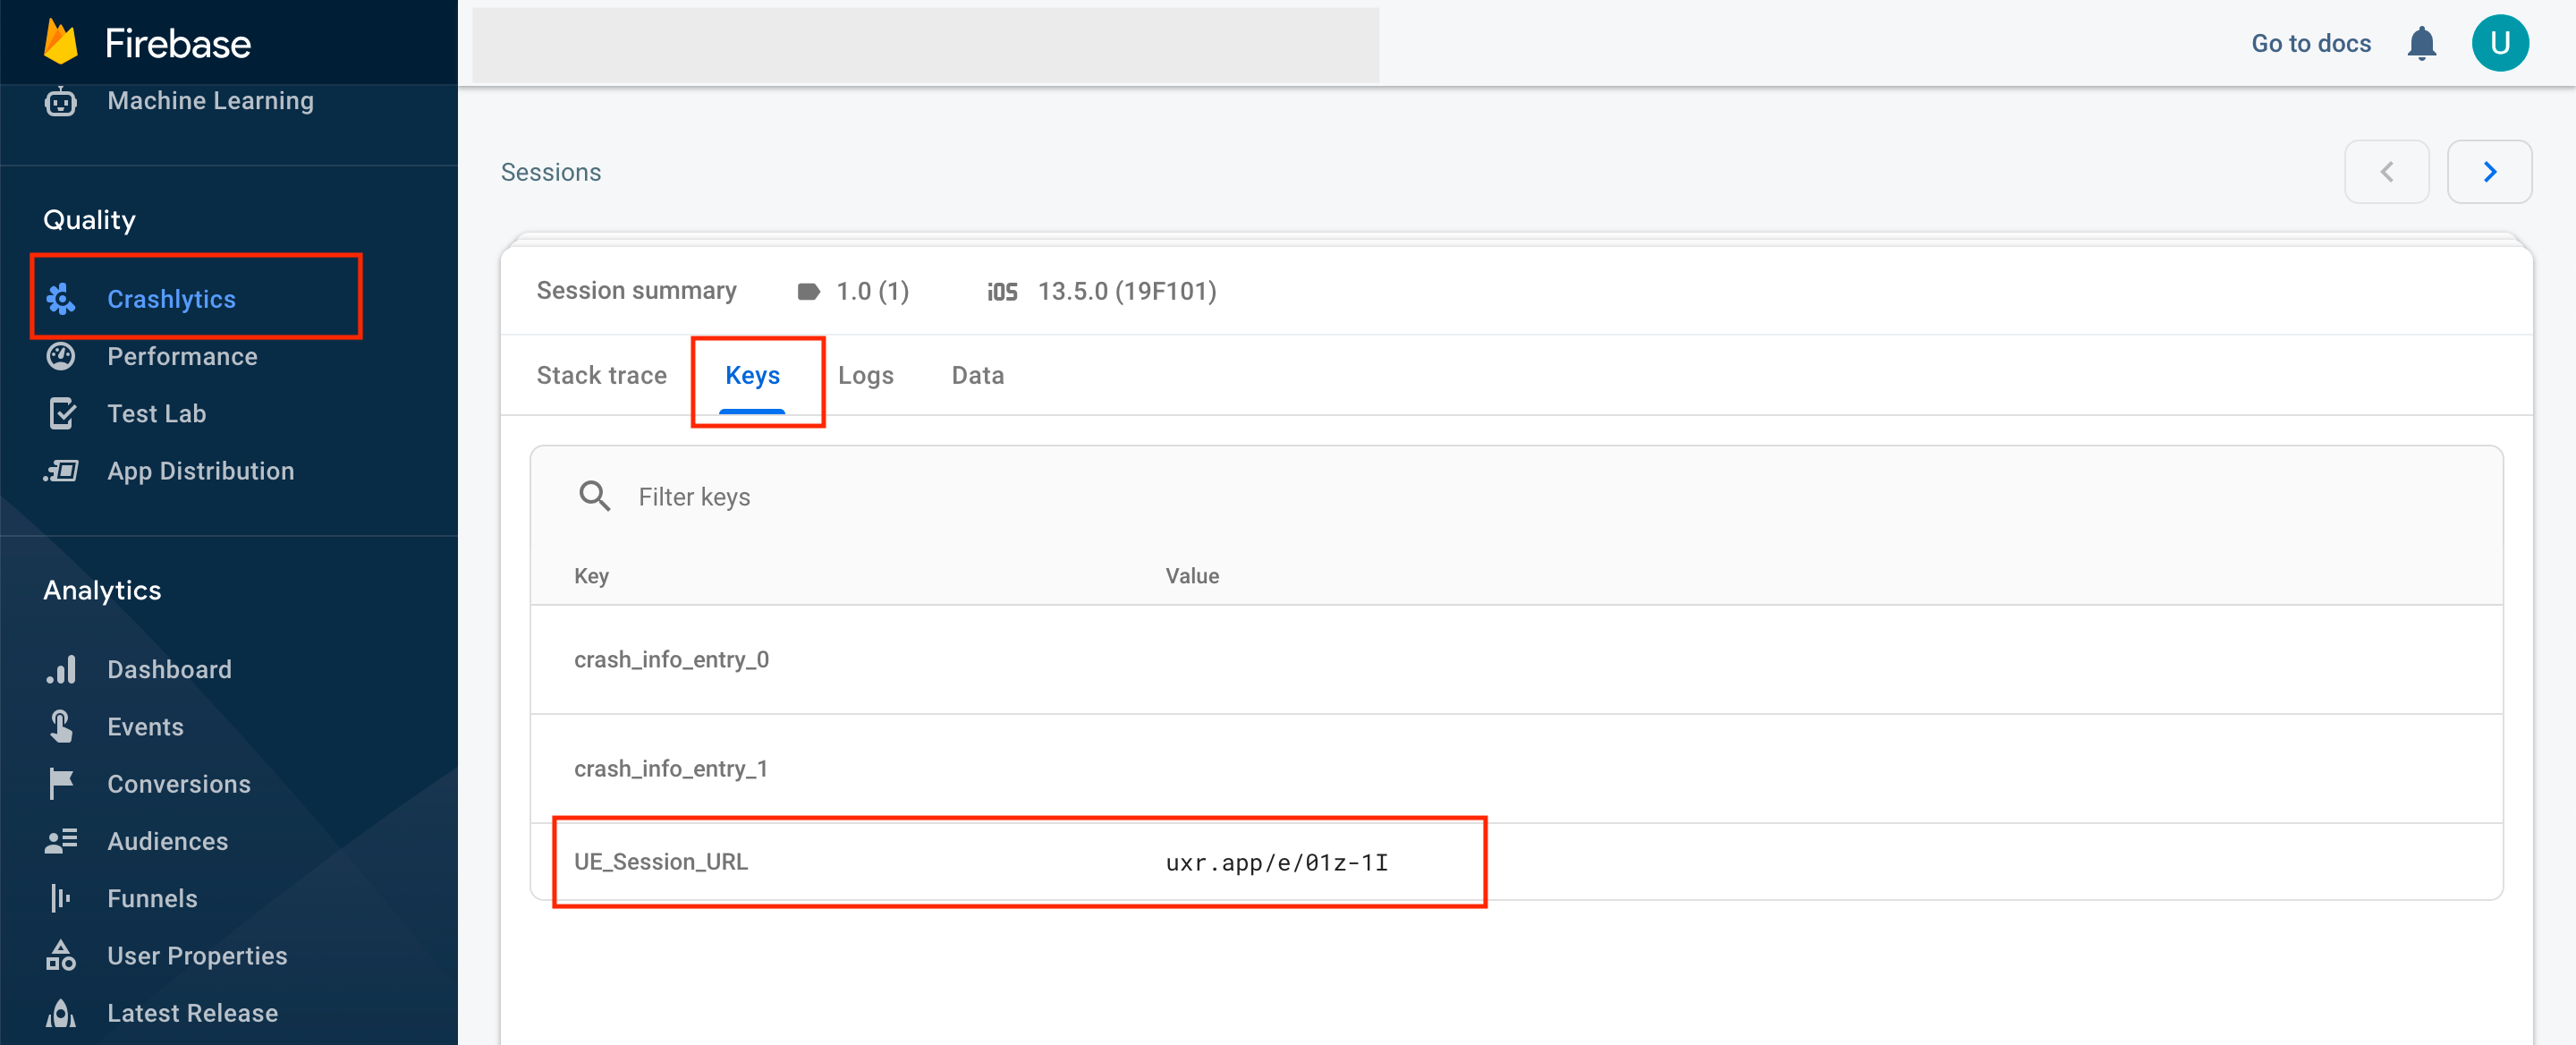
UserExperior URL in Firebase Crashlytics
After completing the integration, every Crashlytics crash log will contain a key called "UE Session URL". You can just copy and paste the URL in your browser's window that will open the session in the UserExperior Dashboard. If the session was recorded you will be able to replay it in the UserExperior Dashboard.
Go to Firebase Console > Go to your app folder > Crashlytics > Click on the crash you want to debug > Click on the Keys
Firebase Google Analytics
Integration
1. Switch On the Firebase Google Analytics in UserExperior Settings
Go to UserExperior Dashboard > Go to your app folder > Go to Settings > Select Integrations > Switch On Firebase Google Analytics

Note: Make sure to switch on the integration for the respective platform i.e. for the Android and the iOS.
2. Add UserExperior Listener/ Delegate immediately after startRecording:
Note: In case of more than one 3rd party integrations, reuse the Listener/ Delegate mentioned below.
Android
Add the following code in the onCreate method of every launcher activity.
UserExperior.startRecording(getApplicationContext(), "your-version-key-here");
// UserExperior Listener: Third Party Integration
UserExperior.setUserExperiorListener(new UserExperiorListener() {
@Override
public void onUserExperiorStarted() {
// Sending UserExperior Session URL to Firebase Google Analytics
String ueSessionUrl = UserExperior.getSessionUrl("FirebaseGoogleAnalytics");
Bundle params = new Bundle();
params.putString("UE_Session_URL", ueSessionUrl);
FirebaseAnalytics.getInstance(getApplicationContext()).logEvent("UE_Session_URL", params);
}
});
iOS
Swift
// Step 1: Add the UserExperiorDelegate protocol in your `AppDelegate.swift`
class AppDelegate: UIResponder, UIApplicationDelegate, UserExperiorDelegate {
}
func application(_ application: UIApplication, didFinishLaunchingWithOptions launchOptions: [UIApplication.LaunchOptionsKey: Any]?) -> Bool {
UserExperior.initialize("USER_KEY")
// Step 2: Setting delegate after UserExperior initialize
UserExperior.setDelegate(self)
return true
}
// Step 3: Implement UserExperiorDelegate protocol
func userExperiorSessionDidStart() {
let sessionURL = UserExperior.getSessionUrl("FirebaseGoogleAnalytics") // "FirebaseGoogleAnalytics" is the key used to identify Firebase Google Analytics
Analytics.logEvent("UE_Session_URL", parameters: ["UE_Session_URL": ga_sessionURL])
}
Objective-C
// Step 1: Add the UserExperiorDelegate protocol in your `AppDelegate.m`
@interface AppDelegate () <UserExperiorDelegate>
@end
- (BOOL)application:(UIApplication *)application didFinishLaunchingWithOptions:(NSDictionary *)launchOptions {
// Override point for customization after application launch.
[UserExperior initialize:@"USER_KEY"];
// Step 2: Setting delegate after UserExperior initialize
[UserExperior setDelegate:self];
return YES;
}
// Step 3: Implement UserExperiorDelegate protocol
- (void)userExperiorSessionDidStart {
NSString *sessionURL = [UserExperior getSessionUrl:@"FirebaseGoogleAnalytics"]; // "FirebaseGoogleAnalytics" is the key used to identify Firebase Google Analytics
[FIRAnalytics logEventWithName:@"UE_Session_URL" parameters:@{@"UE_Session_URL":sessionURL}];
}
React-Native
// Import the following(App.js)
import UserExperior from 'react-native-userexperior';
import { NativeModules, NativeEventEmitter } from 'react-native';
// UserExperior Initialization
UserExperior.startRecording('your-version-key-here');
// Add listener
const emitter = new NativeEventEmitter(NativeModules.UserExperior);
this.userExperiorListener = emitter.addListener('ON_USER_EXPERIOR_STARTED', async (status) => {
if (status) {
let sessionUrl = await UserExperior.getSessionUrl('FirebaseGoogleAnalytics');
// Send session URL to FirebaseGoogleAnalytics
}
});
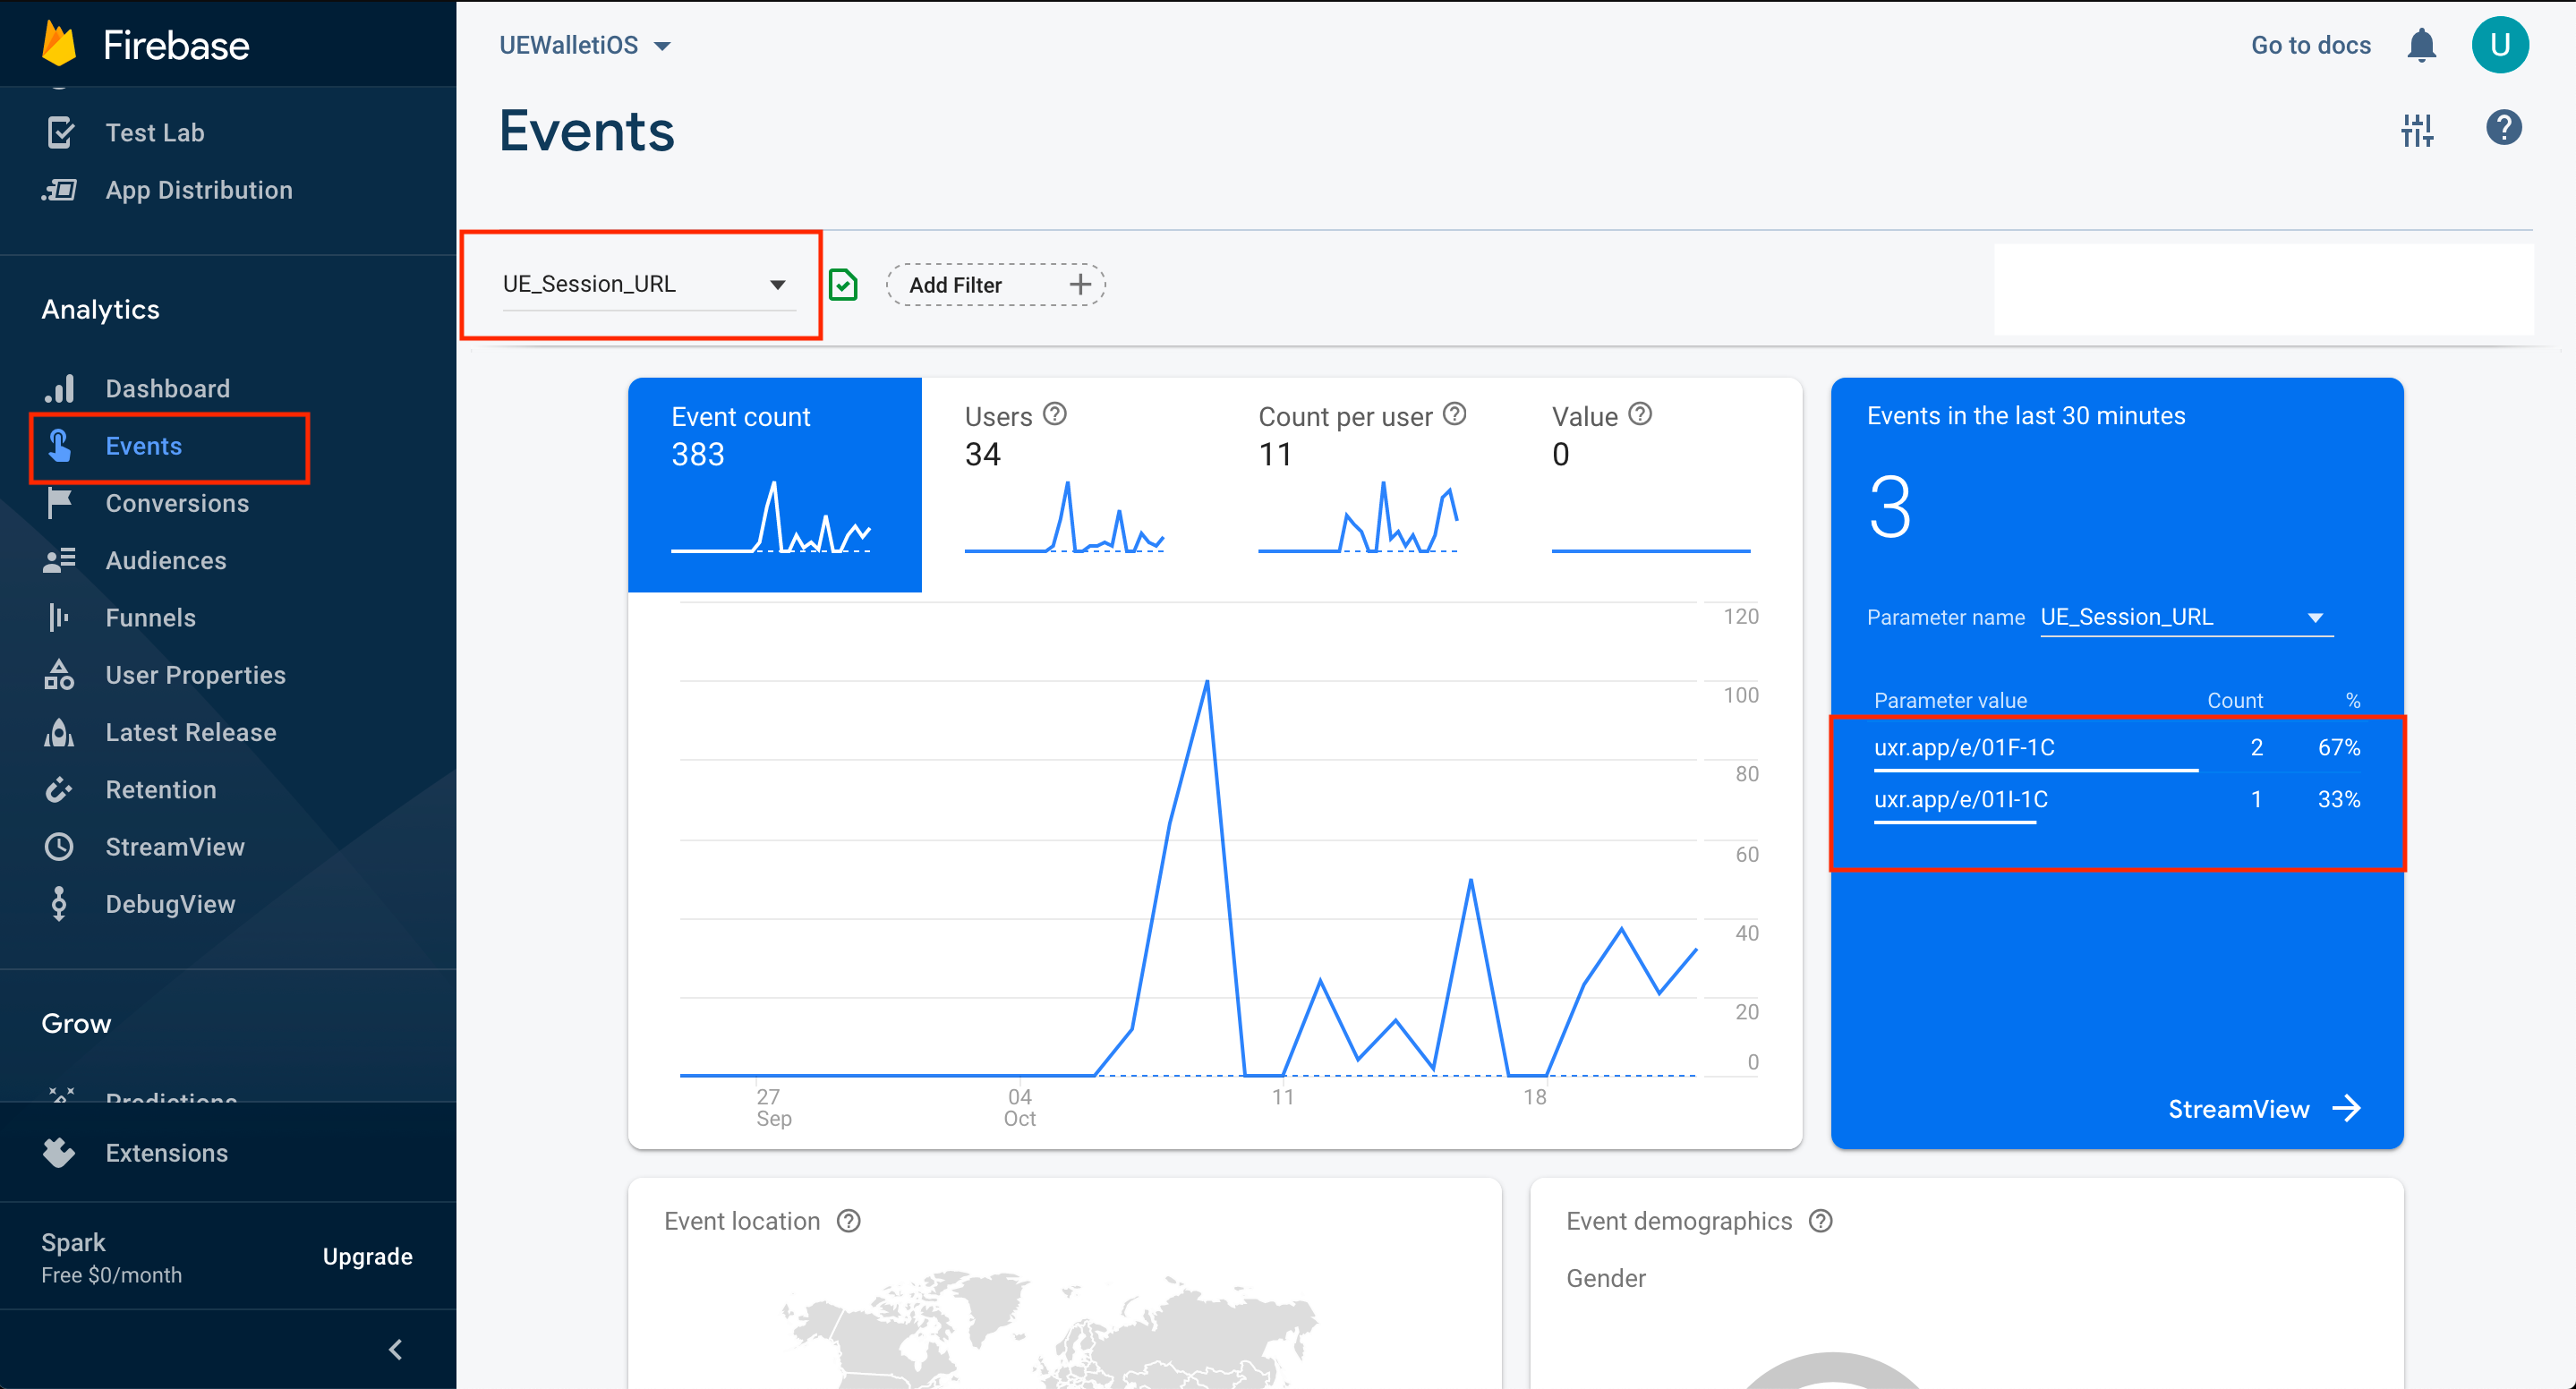
UserExperior URL in Firebase Google Analytics
After completing the integration, every Firebase Google Analytics event will contain an event called "UE_Session_URL". You can just copy and paste the URL in your browser's window that will open the session in the UserExperior Dashboard. If the session was recorded you will be able to replay it in the UserExperior Dashboard.
Go to Firebase Console > Go to your app folder > Events > Under Existing events click on the UE_Session_URL. Now under parameter name UE_Session_URL find parameter value of UserExperior session URL.
Mixpanel
Integration
1. Switch On the Mixpanel in UserExperior Settings
Go to UserExperior Dashboard > Go to your app folder > Go to Settings > Select Integrations > Switch On Mixpanel

Note: Make sure to switch on the integration for the respective platform i.e. for the Androidthe and the iOS.
2. Add UserExperior Listener immediately after startRecording:
Note: In case of more than one 3rd party integrations, reuse the Listener/ Delegate mentioned below.
Android
Add following code in the the onCreate method of every launcher activity.
UserExperior.startRecording(getApplicationContext(), "your-version-key-here");
// UserExperior Listener: Third Party Integration
UserExperior.setUserExperiorListener(new UserExperiorListener() {
@Override
public void onUserExperiorStarted() {
// Sending UserExperior Session URL to Mixpanel
String ueSessionUrl = UserExperior.getSessionUrl("Mixpanel");
JSONObject props = new JSONObject();
props.put("UE_Session_URL", ueSessionUrl);
public static final String MIXPANEL_TOKEN = "put-your-mixpanel-project-token-here";
// Initialize the library with your Mixpanel project token, MIXPANEL_TOKEN, and a reference to your application context.
MixpanelAPI mixpanel = MixpanelAPI.getInstance(context, MIXPANEL_TOKEN);
mixpanel.track("UE_Session_URL", props);
}
});
iOS
Swift
// Step 1: Add the UserExperiorDelegate protocol in your `AppDelegate.swift`
class AppDelegate: UIResponder, UIApplicationDelegate, UserExperiorDelegate {
}
func application(_ application: UIApplication, didFinishLaunchingWithOptions launchOptions: [UIApplication.LaunchOptionsKey: Any]?) -> Bool {
UserExperior.initialize("USER_KEY")
// Step 2: Setting delegate after UserExperior initialize
UserExperior.setDelegate(self)
return true
}
// Step 3: Implement UserExperiorDelegate protocol
func userExperiorSessionDidStart() {
let sessionURL = UserExperior.getSessionUrl("Mixpanel") // "Mixpanel" is the key used to identify Mixpanel
Mixpanel.mainInstance().track(event: "UE_Session_URL", properties: ["UE_Session_URL": mp_sessionURL])
}
Objective-C
// Step 1: Add the UserExperiorDelegate protocol in your `AppDelegate.m`
@interface AppDelegate () <UserExperiorDelegate>
@end
- (BOOL)application:(UIApplication *)application didFinishLaunchingWithOptions:(NSDictionary *)launchOptions {
// Override point for customization after application launch.
[UserExperior initialize:@"USER_KEY"];
// Step 2: Setting delegate after UserExperior initialize
[UserExperior setDelegate:self];
return YES;
}
// Step 3: Implement UserExperiorDelegate protocol
- (void)userExperiorSessionDidStart {
NSString *sessionURL = [UserExperior getSessionUrl:@"Mixpanel"]; // "Mixpanel" is the key used to identify Amplitude
[[Mixpanel sharedInstance] track:@"UE_Session_URL:" properties:@{ @"UE_Session_URL": sessionURL}];
}
React-Native
// Import the following(App.js)
import UserExperior from 'react-native-userexperior';
import { NativeModules, NativeEventEmitter } from 'react-native';
// UserExperior Initialization
UserExperior.startRecording('your-version-key-here');
// Add listener
const emitter = new NativeEventEmitter(NativeModules.UserExperior);
this.userExperiorListener = emitter.addListener('ON_USER_EXPERIOR_STARTED', async (status) => {
if (status) {
let sessionUrl = await UserExperior.getSessionUrl('Mixpanel');
// Send session URL to Mixpanel
}
});
UserExperior URL in Mixpanel
After completing the integration, every Mixpanel session will contain an event called "UE_Session_URL". You can just copy and paste the URL in your browser's window that will open the session in the UserExperior Dashboard. If the session was recorded you will be able to replay it in the UserExperior Dashboard.
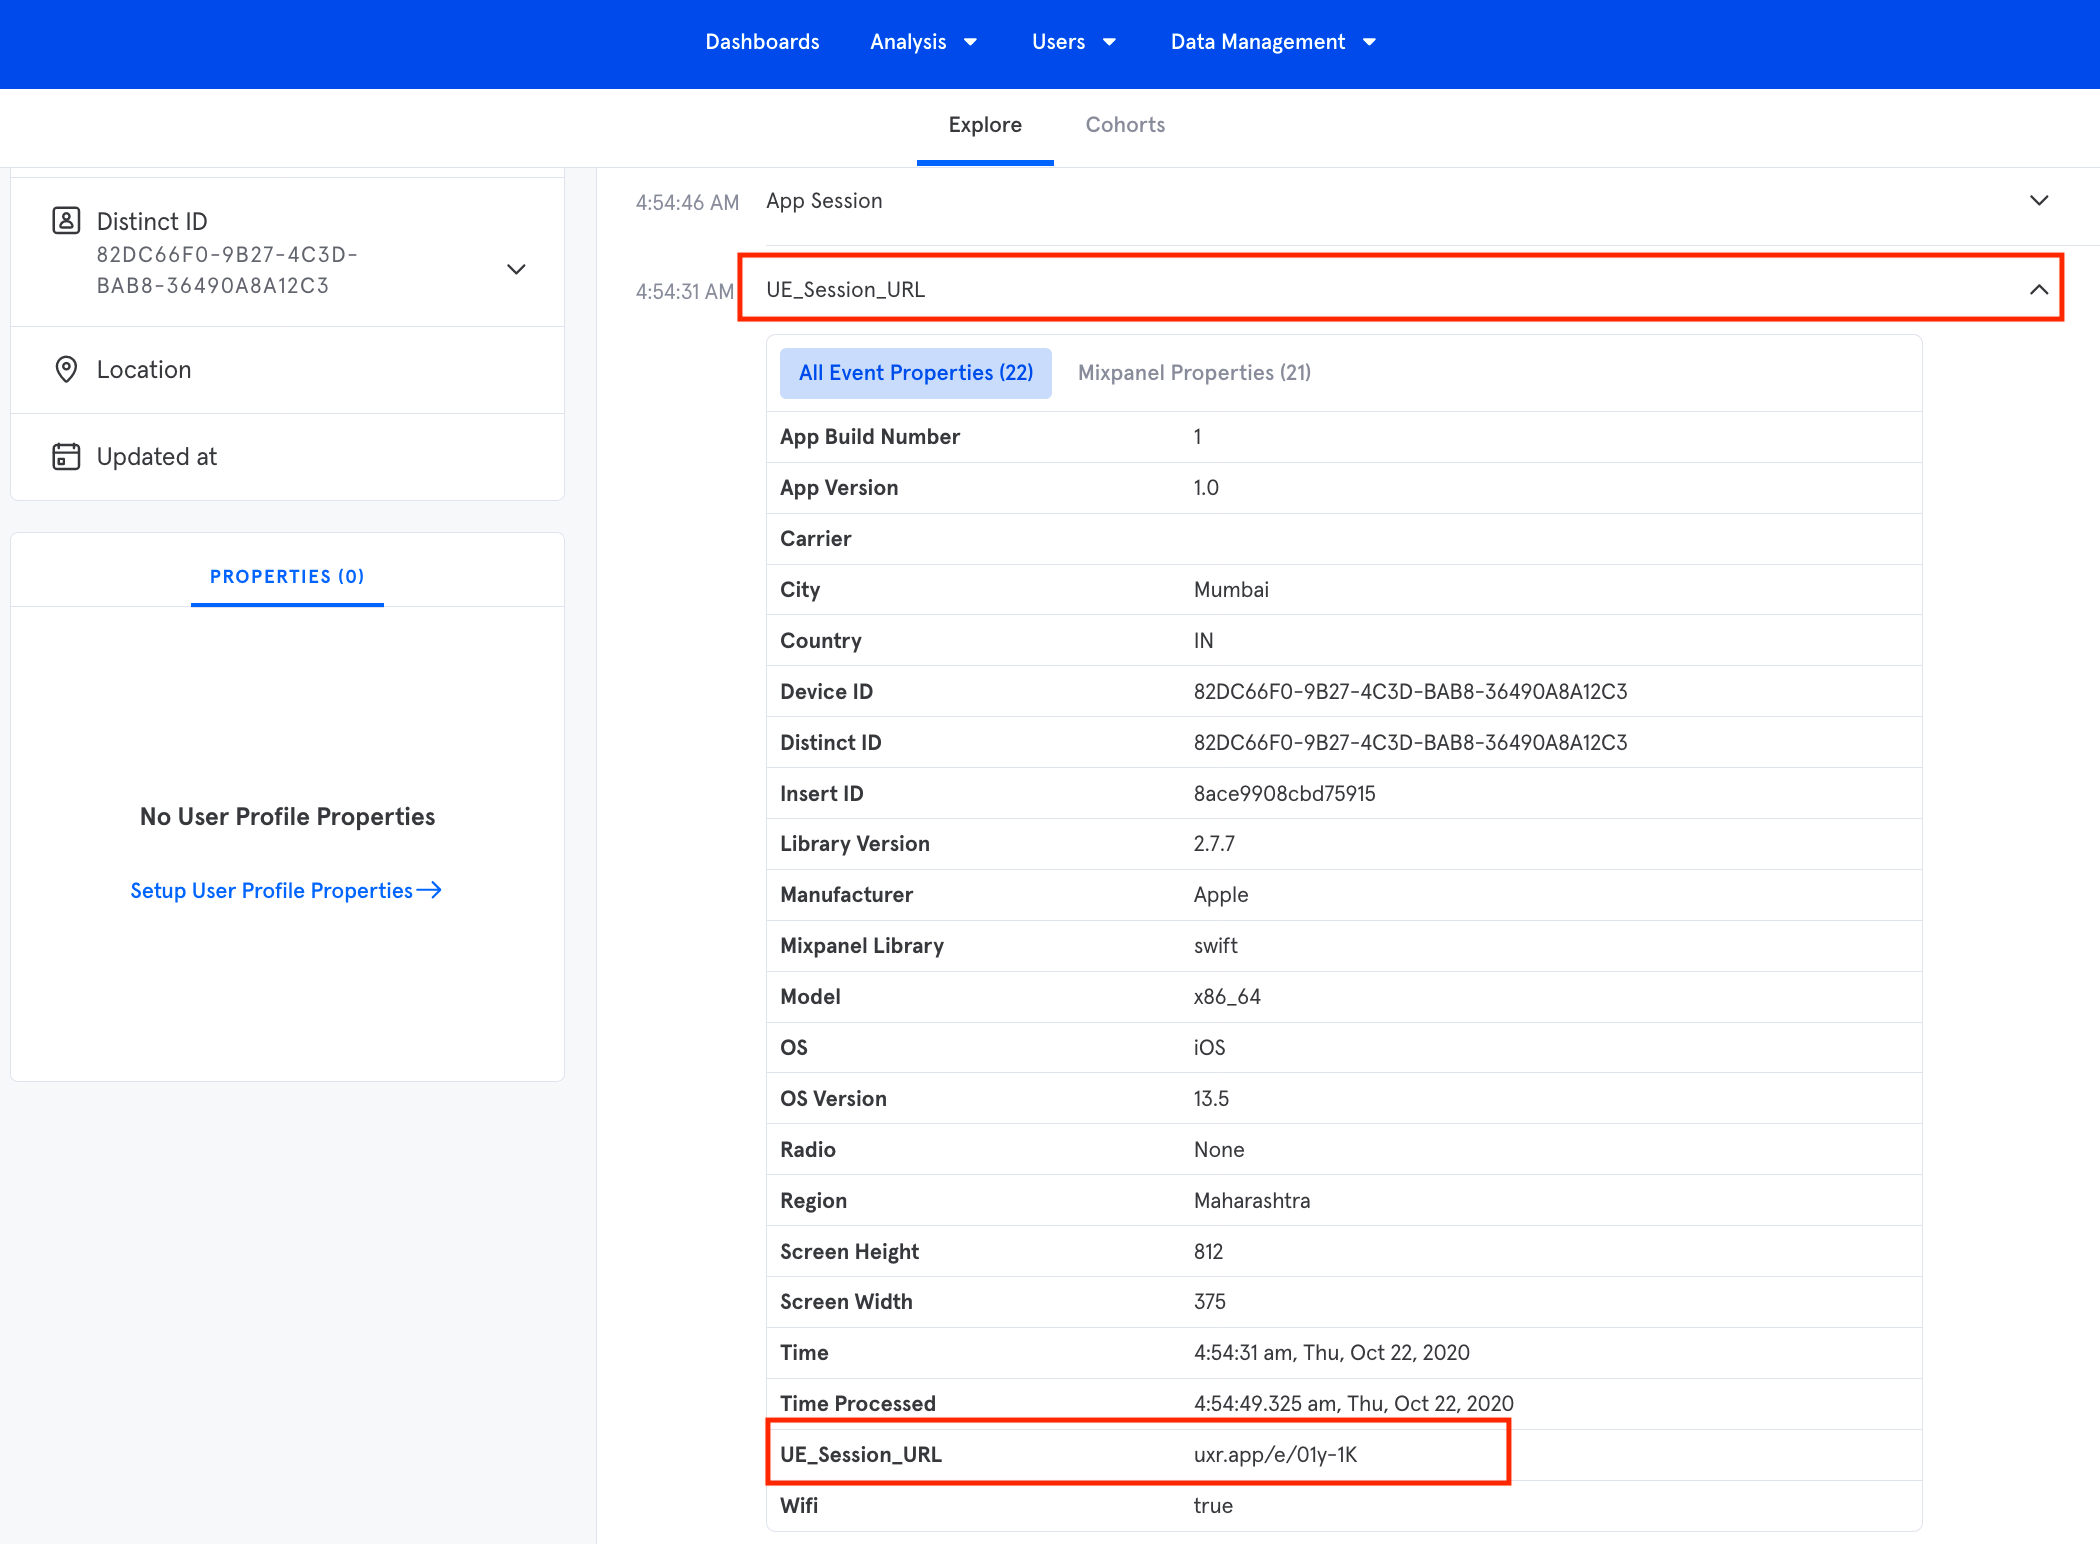
In the app Dashboard, go to Data Management > Live View > Under list of events click on distinct ID of event name UE_Session_URL
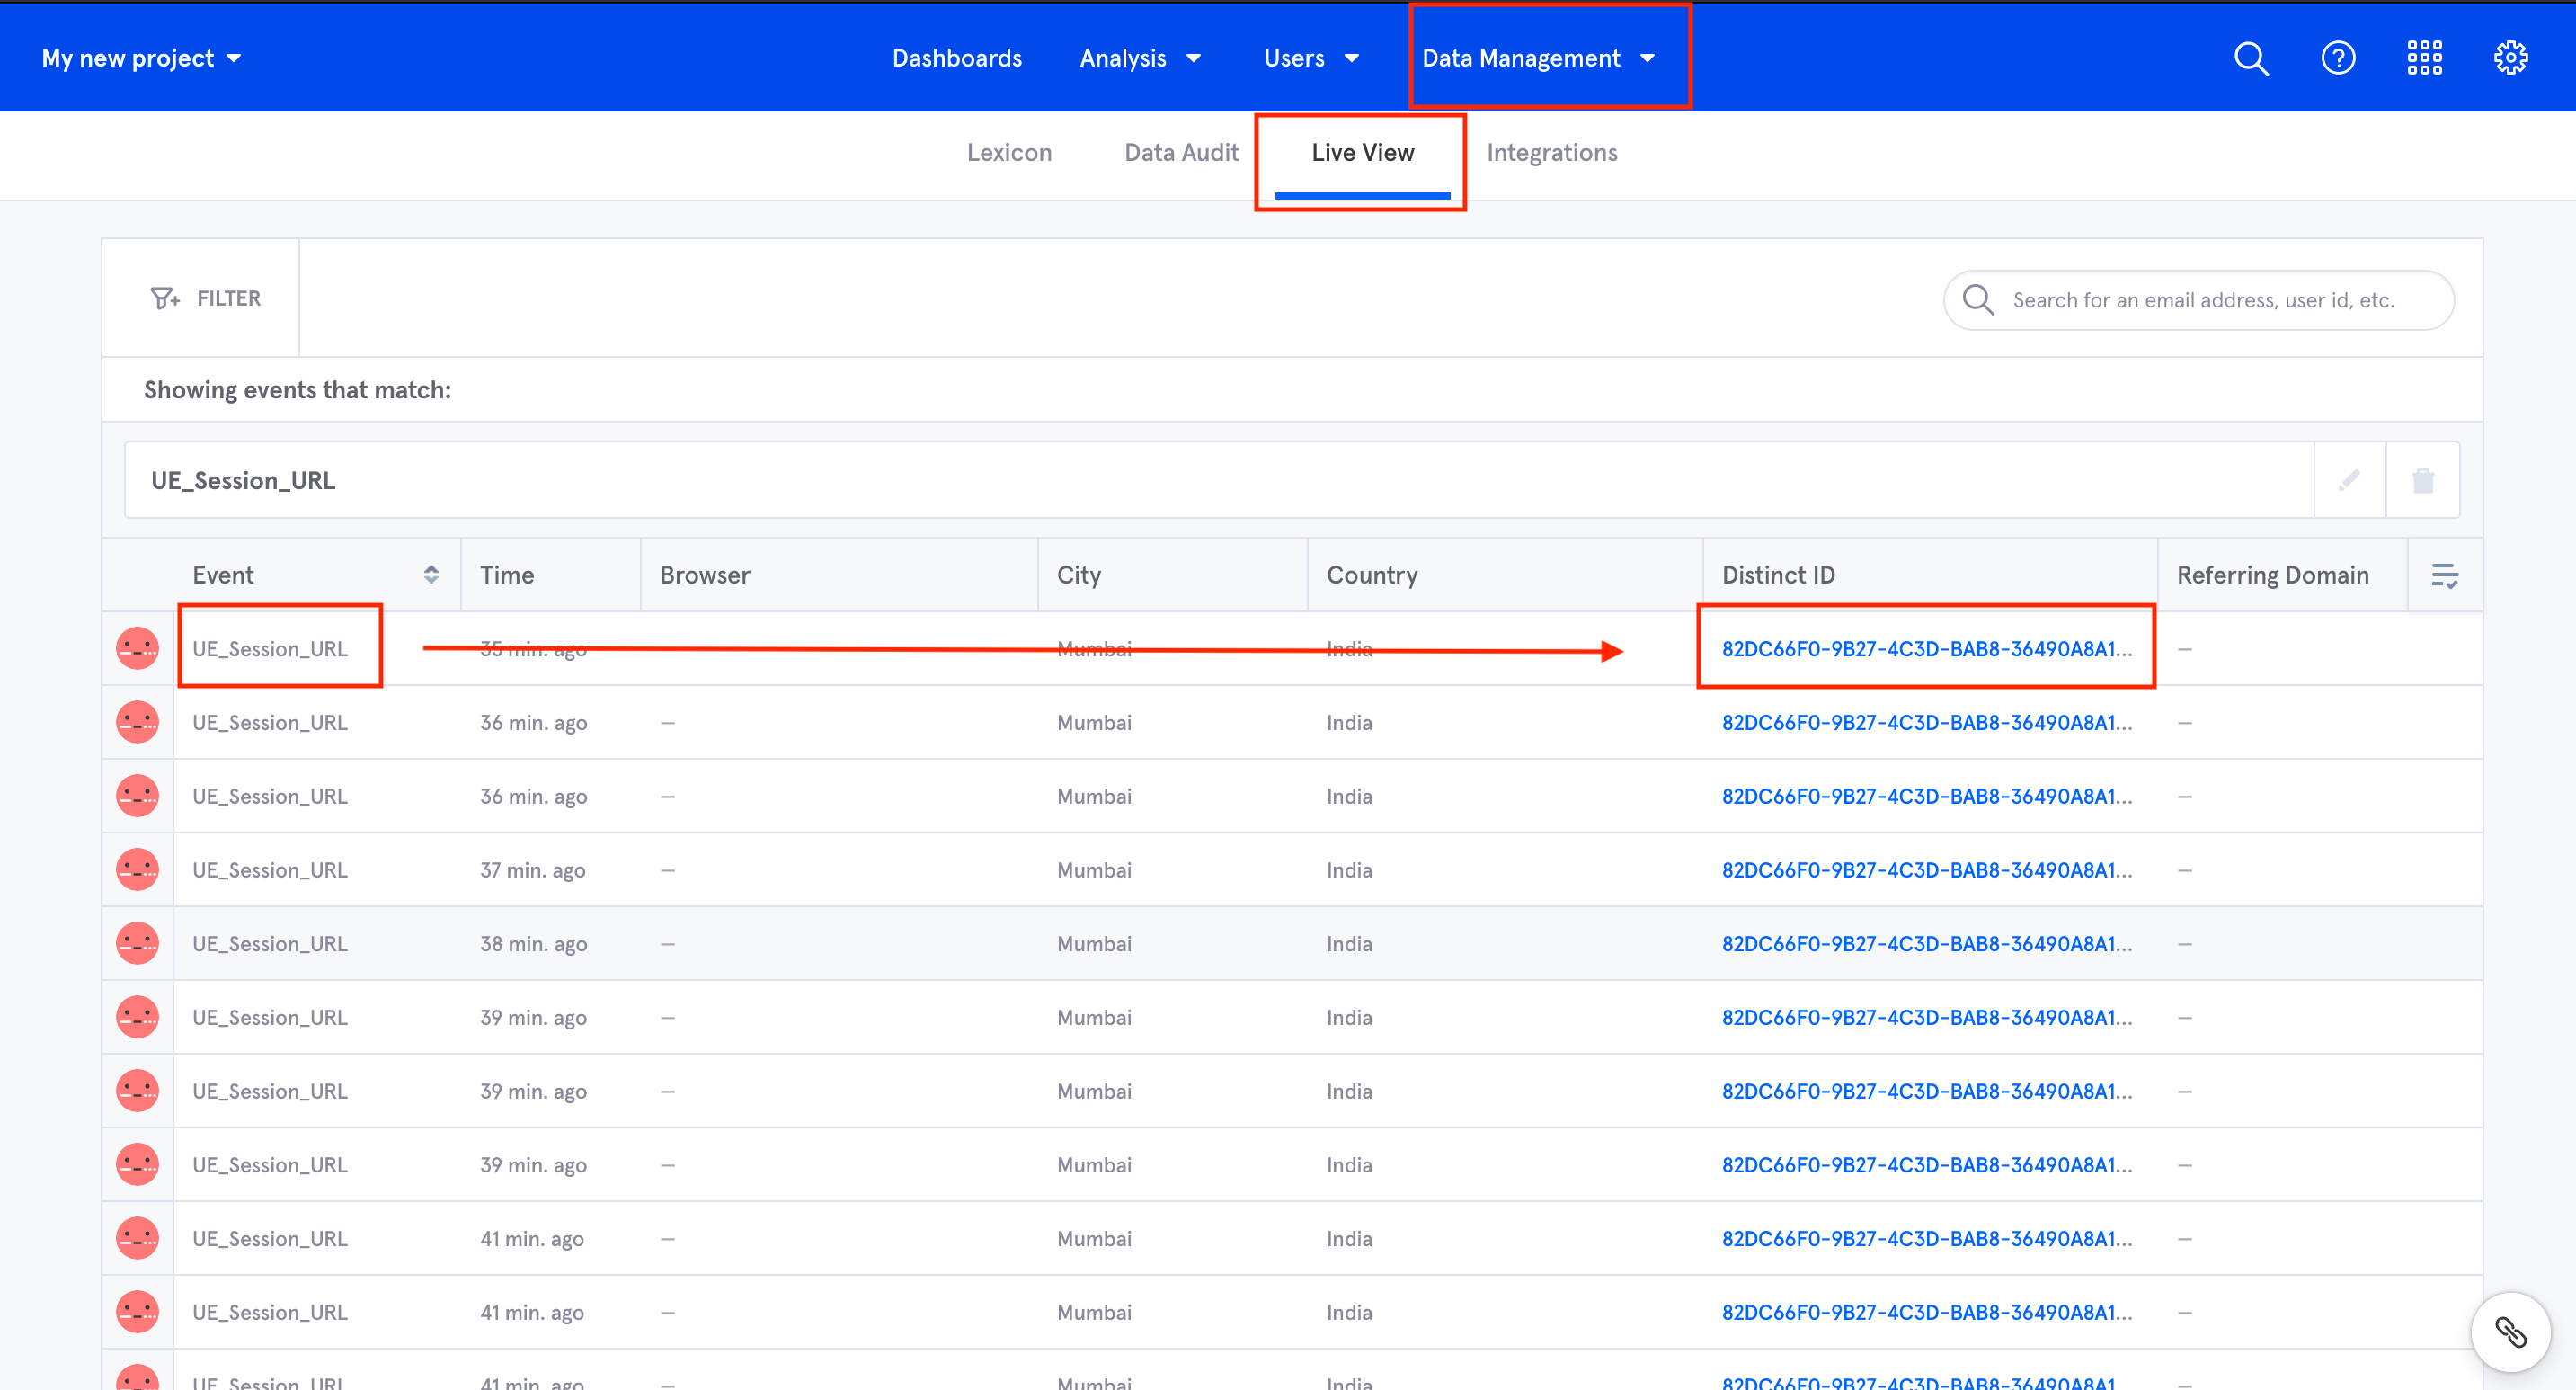
Expand UE_Session_URL and under All event properties find session URL of UserExperior
MoEngage
Integration
1. Switch On the MoEngage in UserExperior Settings
Go to UserExperior Dashboard > Go to your app folder > Go to Settings > Select Integrations > Switch On MoEngage

Note: Make sure to switch on the integration for respective platform i.e. for the Android and the iOS.
2. Add UserExperior Listener/ Delegate immediately after startRecording:
Note: In case of more than one 3rd party integrations, reuse the Listener/ Delegate mentioned below.
Android
Add the the following code in onCreate method of every launcher activity.
UserExperior.startRecording(getApplicationContext(), "your-version-key-here");
// UserExperior Listener: Third Party Integration
UserExperior.setUserExperiorListener(new UserExperiorListener() {
@Override
public void onUserExperiorStarted() {
// Sending UserExperior Session URL to MoEngage
String ueSessionUrl = UserExperior.getSessionUrl("MoEngage");
Properties properties = new Properties();
properties.addAttribute("UE_Session_URL", ueSessionUrl);
MoEHelper.getInstance(getApplicationContext()).trackEvent("UE_Session_URL", properties);
}
});
iOS
Swift
// Step 1: Add the UserExperiorDelegate protocol in your `AppDelegate.swift`
class AppDelegate: UIResponder, UIApplicationDelegate, UserExperiorDelegate {
}
func application(_ application: UIApplication, didFinishLaunchingWithOptions launchOptions: [UIApplication.LaunchOptionsKey: Any]?) -> Bool {
UserExperior.initialize("USER_KEY")
// Step 2: Setting delegate after UserExperior initialize
UserExperior.setDelegate(self)
return true
}
// Step 3: Implement UserExperiorDelegate protocol
func userExperiorSessionDidStart() {
let sessionURL = UserExperior.getSessionUrl("MoEngage") // "MoEngage" is the key used to identify MoEngage
let eventProperties = MOProperties.init(attributes: ["UE_Session_URL": me_sessionURL])
MoEngage.sharedInstance().trackEvent("UE_Session_URL", with: eventProperties)
}
Objective-C
// Step 1: Add the UserExperiorDelegate protocol in your `AppDelegate.m`
@interface AppDelegate () <UserExperiorDelegate>
@end
- (BOOL)application:(UIApplication *)application didFinishLaunchingWithOptions:(NSDictionary *)launchOptions {
// Override point for customization after application launch.
[UserExperior initialize:@"USER_KEY"];
// Step 2: Setting delegate after UserExperior initialize
[UserExperior setDelegate:self];
return YES;
}
// Step 3: Implement UserExperiorDelegate protocol
- (void)userExperiorSessionDidStart {
NSString *sessionURL = [UserExperior getSessionUrl:@"MoEngage"]; // "MoEngage" is the key used to identify MoEngage
MOProperties *eventProperties = [[MOProperties alloc] initWithAttributes:@{ @"UE_Session_URL": sessionURL}];
[[MoEngage sharedInstance] trackEvent:@"UE_Session_URL" withProperties:eventProperties];
}
React-Native
// Import the following(App.js)
import UserExperior from 'react-native-userexperior';
import { NativeModules, NativeEventEmitter } from 'react-native';
// UserExperior Initialization
UserExperior.startRecording('your-version-key-here');
// Add listener
const emitter = new NativeEventEmitter(NativeModules.UserExperior);
this.userExperiorListener = emitter.addListener('ON_USER_EXPERIOR_STARTED', async (status) => {
if (status) {
let sessionUrl = await UserExperior.getSessionUrl('MoEngage');
// Send session URL to MoEngage
}
});
UserExperior URL in MoEngage
After completing the integration, every MoEngage session will contain an event called "UE_Session_URL". You can just copy and paste the URL in your browser's window that will open the session in the UserExperior Dashboard. If the session was recorded you will be able to replay it in the UserExperior Dashboard.
Segment
Integration
UserExperior provides integration with Segment SDK. With UserExperior and Segment Integration, you can automatically track events, screens, user id and user properties in segment and send these to UserExperior. This will eliminate the need to send events to UserExperior separately. UserExperior’s integration with Segment is provided via a middleware that you have to write in the launcher screen just after initializing UserExperior.
If you haven’t integrated UserExperior, first do a basic integration of UserExperior till startRecording to initialize our SDK using the integration guide: https://www.userexperior.com/integration-guide
Follow the below instructions to write the middleware required for UserExperior and Segment integration:
Supported Segment Calls and their equivalent UserExperior APIs
Here you can view a list of Segment's available calls and the UserExperior supported methods you can map it to:
Native Android
After initializing the UserExperior SDK, you have to write the following middleware while initializing Segment SDK. Inside middleware, there are three cases: track, identify, and screen that you can add as per your need.
// Create an analytics client with the given context and Segment write key.
Analytics analytics = new Analytics.Builder(getApplicationContext(), "SEGMENT_WRITE_KEY_HERE")
.trackApplicationLifecycleEvents() // Enable this to record certain application events automatically!
.recordScreenViews() // Enable this to record screen views automatically!
.useSourceMiddleware(new Middleware() {
@Override
public void intercept(Chain chain) {
BasePayload payload = chain.payload();
switch (payload.type()) {
// Add your cases here
}
chain.proceed(payload);
}
})
.build();
Add case track to send Events to UserExperior
case track:
HashMap<String, Object> params = new HashMap<>();
String key = payload.getString("event");
ValueMap map = payload.getValueMap("properties");
if (map != null) {
for (Map.Entry<String, Object> entry : map.entrySet()) {
params.put(entry.getKey(), entry.getValue());
}
}
try {
UserExperior.logEvent(key, params);
} catch (Exception e) {
e.printStackTrace();
}
break;
Add case identify to track User Identity:
case identify:
String userId = payload.userId();
if (userId != null) {
try {
UserExperior.setUserIdentifier(userId);
} catch (Exception e) {
e.printStackTrace();
}
}
Object payloadTraits = payload.get("traits");
if (payloadTraits instanceof Map) {
Map<Object, Object> traits = (Map<Object, Object>) payloadTraits;
HashMap<String, Object> ueMap = new HashMap<>();
for (Map.Entry<Object, Object> entry : traits.entrySet()) {
ueMap.put(entry.getKey().toString(), entry.getValue().toString());
}
try {
UserExperior.setUserProperties(ueMap);
} catch (Exception e) {
e.printStackTrace();
}
}
break;
Add case screen to tag Screen Names
case screen:
String screenName = payload.getString("name");
try {
UserExperior.startScreen(screenName);
} catch (Exception e) {
e.printStackTrace();
}
break;
Native iOS
After initializing the UserExperior SDK, you can create Segment middleware and initialize Segment, inside the middleware code you can add the cases you need to send to UserExperior:
let segmentConfiguration = AnalyticsConfiguration(writeKey: SEGMENT_API_KEY)
// Make other configuration changes
let ueMiddleware = BlockMiddleware(block: { (context, next) in
switch (context.eventType) {
// Add the cases here
default: break
}
next(context)
})
segmentConfiguration.sourceMiddleware = [ueMiddleware]
Analytics.setup(with: segmentConfiguration)
To set the User Identity
case .identify:
if let user = context.payload as? IdentifyPayload {
var userProperties = [String: String]()
// Stringify track properties
user.traits?.forEach({ (key: AnyHashable, value: Any) in
userProperties["\(key)"] = "\(value)"
})
UserExperior.setUserIdentifier(user.userId)
}
To send Custom Event
Add a case .track to your middleware:
case .track:
if let track = context.payload as? TrackPayload {
var properties = [String: String]()
// Stringify track properties
track.properties?.forEach({ (key: AnyHashable, value: Any) in
properties["\(key)"] = "\(value)"
})
let check = track.event
if check != "button to ignore" {
UserExperior.logEvent(track.event, withProperties: properties)
}}
To identify the Screen
Add a case .screen to your middleware:
case .screen:
if let screen = context.payload as? ScreenPayload {
var properties = [String: String]()
// Stringify track properties
screen.properties?.forEach({ (key: AnyHashable, value: Any) in
properties["\(key)"] = "\(value)"
})
UserExperior.startScreen(screen.name)
}
React Native
If you haven’t integrated the UserExperior ReactNative Plugin, first do a basic integration of UserExperior till startRecording to initialize our plugin using our ReactNative integration guide: https://www.userexperior.com/developer-docs/react-native
Follow the instructions below to Integrate UserExperior with Segment for React Native framework mobile apps.
Steps
- Download UserExperiorSegmentPlugin.ts file and put it in the project’s /src folder: https://drive.google.com/file/d/1-9WK3AiIrBvHiaQOr_eTb7w6dJx6ArLM/view?usp=sharing
- Add the UserExperiorSegmentPlugin as segment plugin in “App.js”
import { UserExperiorSegmentPlugin } from './src/UserExperiorSegmentPlugin'; // PATH TO THE FILE
export const segmentClient = createClient({
writeKey: "SEGMENT_WRITE_KEY_HERE",
trackAppLifecycleEvents: true,
//additional config options
});
segmentClient.add({ plugin: new UserExperiorSegmentPlugin() });
- Now start using the following segment methods as normal and those calls will automatically call respective UserExperior methods
// Following code is equivalent to `logEvent` method in UserExperior
segmentClient.track('View Product', {
productId: 123,
productName: 'Striped trouser'
});
segmentClient.track("Awesome Event");
// Following code is equivalent to `startScreen` method in UserExperior
segmentClient.screen("Home Screen")
// Following code is equivalent to `setUserIdentifier` method in UserExperior
segmentClient.alias('user-123');
// Following code is equivalent to `setUserProperties` method in UserExperior
segmentClient.identify('user-123', {
username: 'User XYZ',
email: 'xyz@example.com',
plan: 'premium',
});

%20(1).png)
